Module 03: Deterministic Agent Flow with LangGraph
Chains respond in sequence. Graphs respond with purpose.
This module marks the transition from demo-quality agents to production-ready systems using LangGraph. It explains why linear chains fail in production and how graph-based architectures solve the problems of explicit control flow, state management, and error handling. You’ll learn to build agents with deterministic workflows using nodes and edges, implement conditional routing for decision-based execution paths, add checkpointing for pause/resume capability, and create retry logic with exponential backoff. The module culminates in building a multi-stage research agent that demonstrates all these production patterns in action.
LangGraph, Graph-based Architecture, State Management, Deterministic Control Flow, Conditional Routing, Checkpointing, Error Recovery, Retry Logic, Production Agents, Workflow Orchestration, Observable Execution, StateGraph
What You’ll Learn
This module is where things get real. Up until now, you’ve been building agents with simple chains—linear execution, implicit state, hope for the best. That works for demos. It doesn’t work for production.
Here’s what actually separates toy agents from production systems: explicit control flow. You need to know exactly what your agent is doing, be able to pause and resume it, handle errors gracefully, and route based on actual decisions—not just hope the LLM figures it out.
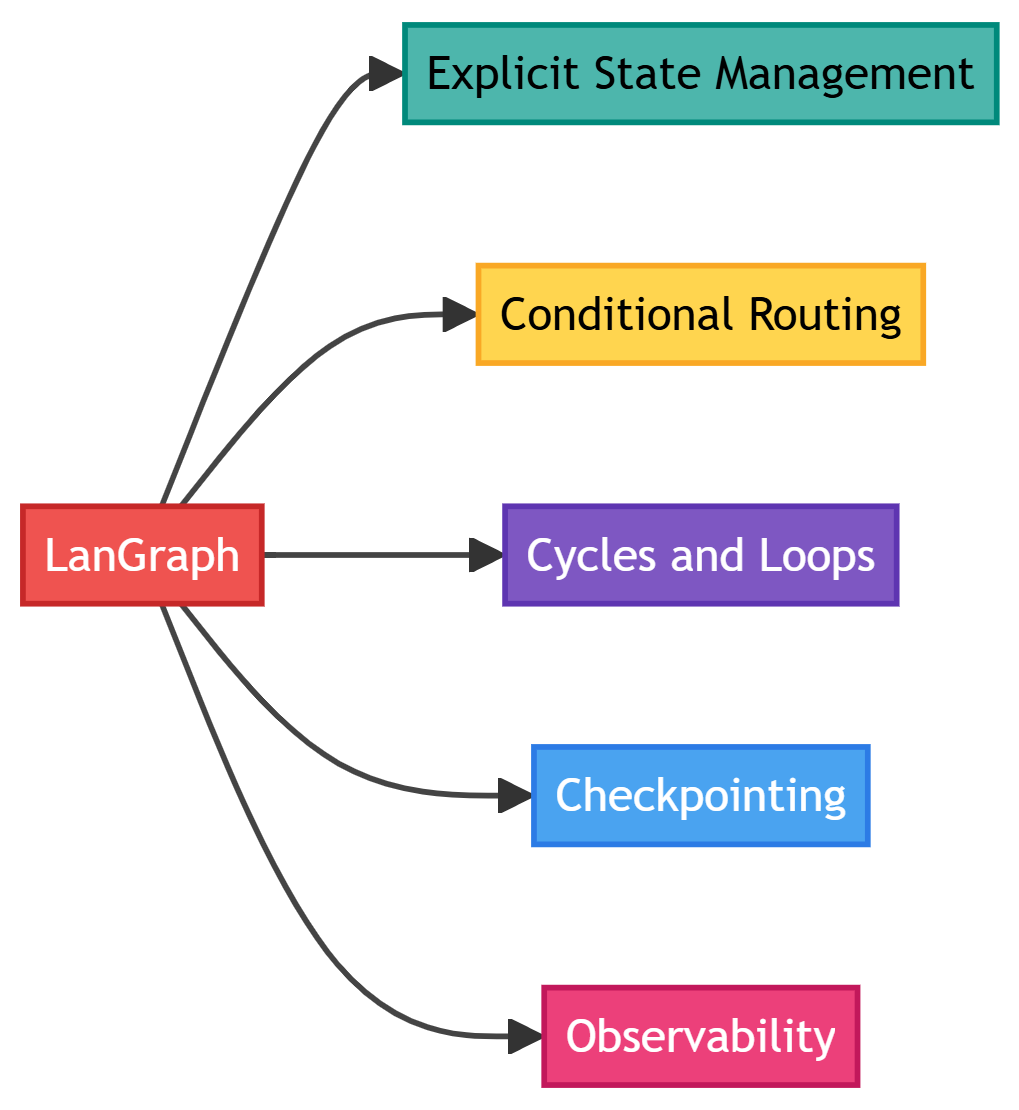
The Core Skills
Graph-based architecture - Why workflows need to be flowcharts, not pipelines. Chains execute sequentially with no branching. Graphs let you make decisions, loop back on errors, and handle the messy reality of production.
Explicit state management - Everything your agent knows lives in one place that you can inspect, save, and resume from. No more hidden state buried in conversation history.
Deterministic control flow - Define exactly how your agent moves through its workflow using nodes (what it does) and edges (when it does it). Conditional routing means “if error, retry” not “if error, ¯_(ツ)_/¯”
Checkpointing and retries - Save state after each step so you can resume from failures. Implement retry logic with exponential backoff. This is what makes agents production-ready.
Observable execution - See exactly what your agent is doing at each step. Debug based on facts, not guesses.
By the end, you’ll build a multi-stage research agent that can pause, resume, retry on errors, and show you exactly what it’s doing at each step.
Module Structure
- Time: 5-6 hours with exercises
- Prerequisites: Modules 1-2 complete, basic grasp of state machines (if-then-else counts)
The module splits roughly into:
- 30% Understanding why chains fail
- 30% LangGraph fundamentals (nodes, edges, state)
- 25% Advanced patterns (checkpointing, retries, routing)
- 15% Building the research agent
The Exercise
This module features one comprehensive exercise that builds a research agent with deterministic flow:
- Step 1: Define State (20 min). Create a typed state schema for the research workflow.
- Step 2: Define Tools (30 min). Implement web search, content extraction, and summarization tools.
- Step 3: Create Nodes (45 min). Build nodes for research, analysis, synthesis, and review phases.
- Step 4: Build Graph (30 min). Wire nodes together with conditional routing and checkpointing.
- Step 5: Execute with Checkpointing (25 min). Run the agent with pause/resume capability.
- Extension Challenges (60 min). Add retry logic, parallel execution, and visualization.
Why This Actually Matters
The patterns in this module prevent the most expensive production failures.
Deterministic control flow means you can reason about your agent. When something breaks at 3 AM, you need to know exactly what path the agent took and why. Graphs give you that visibility. Chains don’t.
State management enables debugging, testing, and compliance. You can inspect the exact state that led to a failure. You can write tests that verify state transitions. You can audit what your agent knew at any point.
Checkpointing turns catastrophic failures into resumable tasks. Without it, a timeout on step 47 of 50 means starting over. With it, you resume from step 47. At scale, this saves thousands of dollars in wasted compute.
Retry logic handles the reality of external dependencies. APIs fail. Rate limits hit. Networks timeout. Proper retry patterns with backoff prevent these transient failures from becoming user-facing errors.
Companies that adopt LangGraph report 40-60% reduction in agent-related incidents. The explicit control flow makes problems visible before they become production fires.
The Problem with Chains
In Module 2, you built agents using tool-calling loops. They work. But they have problems that only show up when you try to deploy them.
# Traditional chain approach
result = (
    prompt_template
    | llm  # or "claude-sonnet-4"
    | output_parser
    | tool_executor
    | llm  # or "claude-sonnet-4"
    | output_parser
)
What’s wrong with this?
Linear execution - No conditional branching. Every step runs in order, always. Can’t skip steps or change the path based on what happened.
Implicit state - State is hidden in conversation history. Want to know if the search succeeded? Good luck finding it in message arrays.
Non-deterministic - Same input can take different paths depending on what the LLM decides. Debugging is a nightmare.
Hard to debug - Execution is opaque. Something failed on step 7? Hope you added logging everywhere.
Difficult to resume - No checkpointing. If it crashes on step 8 of 10, you start over from step 1.
What production actually needs:
- Explicit state you can inspect
- Conditional routing based on decisions and errors
- Ability to pause, resume, and retry
- Observable execution paths
- Deterministic behavior (same state → same path)
This is where LangGraph comes in. It’s built specifically for this.
Why Graphs Beat Chains
Workflows Are Flowcharts, Not Pipelines
If you look at the Linear Pipeline in the below diagram, the mental model is simple: input goes in, steps execute in order, output comes out. There are no choices to make and no way back. This works when every step is predictable and success is assumed.

But when you look at the Workflow Graph, the shape immediately changes. On a whiteboard, you don’t draw a straight line. You draw boxes and arrows with questions in between:
- Do I need a tool?
- Is the answer good enough?
- Should I retry with more context?
Those questions become decision nodes, and the arrows coming back to the LLM become loops. Tool calls feed results back into the same reasoning step. Low-confidence answers trigger retries instead of silent failure. That structure is a graph, not a chain.
The key difference isn’t visual—it’s architectural: Pipelines execute steps. Workflows make decisions under uncertainty. Once your agent can branch, retry, or re-evaluate, you’re no longer building a pipeline. You’re building a flowchart—and your architecture needs to reflect that.

What LangGraph Actually Gives You
Explicit State Management
Chain approach:
# State is hidden in conversation history
messages = [
    {"role": "user", "content": "Find sales data"},
    {"role": "assistant", "content": "Searching..."},
    # State is implicit - hard to track what happened
]
LangGraph approach:
# State is explicit and typed
class AgentState(TypedDict):
    messages: List[Message]
    task: str
    search_results: Optional[List[Dict]]
    retry_count: int
    status: Literal["searching", "processing", "complete", "error"]
Why this matters:
- You can inspect state at any point
- State transitions are observable
- Easy to persist and resume
Conditional Routing
Chain approach:
# All steps execute in order, always
chain = search | process | format | respond
LangGraph approach:
# Route based on state and decisions
def route_next_step(state: AgentState) -> str:
    if state["status"] == "error" and state["retry_count"] < 3:
        return "retry"
    elif state["search_results"]:
        return "process_results"
    else:
        return "ask_for_clarification"
Why this matters:
- Different paths for different scenarios
- Handle errors gracefully
- Avoid unnecessary work
Cycles and Loops
Chain limitation:
# Cannot loop back to previous steps
# Must restart entire chain
LangGraph capability:
# Can loop for retry, refinement, or iteration
graph.add_edge("validate", "process")  # Success path
graph.add_edge("validate", "refine")   # Needs improvement
graph.add_edge("refine", "validate")   # Loop back
Why this matters:
- Self-correction loops
- Iterative refinement
- Retry mechanisms
Checkpointing
Chain approach:
# If it fails, start over
# No intermediate state saved
LangGraph approach:
# Save state at each step
checkpointer = MemorySaver()
graph = graph.compile(checkpointer=checkpointer)

# Resume from last checkpoint
result = graph.invoke(state, config={"thread_id": "123"})
Why this matters:
- Fault tolerance
- Long-running workflows
- Human-in-the-loop at any step
Observability
Chain approach:
# Black box execution
result = chain.invoke(input)
# What happened inside? 🤷
LangGraph approach:
# Every state transition is logged
for step in graph.stream(state):
    print(f"Node: {step['node']}")
    print(f"State: {step['state']}")
    # Full visibility into execution
Why this matters:
- Debugging
- Monitoring
- Audit trails
When to Use Graphs vs Chains
| Scenario | Use Chain | Use Graph |
|---|---|---|
| Simple linear workflow | ✅ | ❌ |
| Single LLM call | ✅ | ❌ |
| No branching logic | ✅ | ❌ |
| Needs conditional routing | ❌ | ✅ |
| Error handling & retries | ❌ | ✅ |
| Long-running workflows | ❌ | ✅ |
| Needs checkpointing | ❌ | ✅ |
| Multi-step decision making | ❌ | ✅ |
| Production agents | ❌ | ✅ |
Rule of thumb: If your agent has more than 3 steps or any conditional logic, use a graph.
LangGraph Core Concepts
The following diagrams illustrates the core components of LangGraph and how they interact with each other.


Let’s go deep in each component one by one.
Part 1: State, Reducers, Nodes and Edges
State (The Agent’s Working Memory / Single Source of Truth)
State is where everything your agent knows lives. Not in variables, not in message history—in one structured place you can inspect and modify.
The following two Python examples illustrates how you go about building state step by step.
Step 1: Start Simple
from typing import TypedDict

class MinimalState(TypedDict):
    """The absolute minimum: just messages."""
    messages: list

# This works, but you'll want more
Step 2: Add What You Need to Track
from typing import TypedDict, Annotated, Sequence
from langchain_core.messages import BaseMessage
from langgraph.graph import add_messages

class AgentState(TypedDict):
    """Production-ready state with everything you need."""

    # Conversation - special handling for appending
    messages: Annotated[Sequence[BaseMessage], add_messages]

    # What are we doing?
    task: str
    current_step: str  # "planning", "executing", "validating"

    # Retry logic
    attempts: int
    max_attempts: int

    # Results
    final_answer: str | None

    # Status tracking
    status: str  # "running", "complete", "error"
    error_message: str | None
What each field does:
- messages: Conversation history. The
add_messagesannotation means new messages get appended, not replaced. - task: The original user request. Never changes, always available for context.
- current_step: Where we are in the workflow. Useful for debugging and routing.
- attempts/max_attempts: Retry tracking. Prevent infinite loops.
- final_answer: The output we’ll return. Separate from intermediate work.
- status/error_message: Execution state. Makes error handling explicit.
State Reducers (The Merge Strategy)
Reducers control how state updates merge when multiple nodes modify the same field. Default behavior is replace (new overwrites old), but you can use add for accumulation, add_messages for smart appending, or custom functions for domain-specific merge logic.

This diagram illustrates the critical problem reducers solve in LangGraph: what happens when multiple nodes update the same field?
The Scenario: Starting from {status: 'idle', attempts: 0}, two nodes run and both update the same fields. Node A sets attempts: 1, Node B sets attempts: 2.
Without Reducers (Left Path): The default “replace” behavior means the last update wins. You end up with attempts: 2, completely losing Node A’s contribution. If Node A represented one retry attempt, that count just disappeared from your state.
With Add Reducer (Right Path): By annotating the field as Annotated[int, add], you tell LangGraph to accumulate values instead of replacing them. Now you get attempts: 3 (the initial 0 + Node A’s 1 + Node B’s 2), preserving all contributions.
The Key Insight: Different fields need different merge strategies. status should use “replace” (you want the latest status, not accumulated statuses). attempts should use “add” (you want the total count, not just the last count). Reducers let you specify the right strategy per field, preventing silent data loss in your agent’s state.
Following are the two example reducers in Python.
Example 1: Reducers control merge behavior
from operator import add
from typing import Annotated

class SmartState(TypedDict):
    # Replace (default): New value overwrites old
    status: str
    current_step: str

    # Add: Accumulate values
    total_tokens: Annotated[int, add]
    total_cost: Annotated[float, add]

    # Custom: Your logic
    def merge_unique_urls(old: list, new: list) -> list:
        """Combine lists, remove duplicates."""
        return list(set(old + new))

    visited_urls: Annotated[list, merge_unique_urls]

    # Messages: Smart appending (handles updates by ID)
    messages: Annotated[Sequence[BaseMessage], add_messages]
Example 2: When each reducer makes sense
# Replace: Most fields (status, current_step, task, error_message)
# You want the latest value, not accumulated values

# Add: Counters and accumulators
total_tokens: Annotated[int, add]  # 100 + 50 = 150
total_cost: Annotated[float, add]  # 0.002 + 0.003 = 0.005

# Custom: Domain-specific logic
# Example: Merge search results without duplicates
def merge_results(old: list[dict], new: list[dict]) -> list[dict]:
    """Merge search results, dedupe by URL."""
    seen_urls = {r["url"] for r in old}
    unique_new = [r for r in new if r["url"] not in seen_urls]
    return old + unique_new

search_results: Annotated[list[dict], merge_results]

# add_messages: Special case for conversation
# Appends new messages, updates existing by ID
messages: Annotated[Sequence[BaseMessage], add_messages]
State in Action: A Complete Example
from typing import TypedDict, Annotated, Sequence
from langchain_core.messages import BaseMessage, HumanMessage, AIMessage
from langgraph.graph import add_messages
from operator import add

class ProductionState(TypedDict):
    """Real-world state for a research agent."""

    # User request
    task: str

    # Conversation
    messages: Annotated[Sequence[BaseMessage], add_messages]

    # Workflow tracking
    current_step: str  # "planning", "searching", "analyzing", "writing"
    steps_completed: list[str]

    # Retry logic
    attempts: int
    max_attempts: int

    # Cost tracking
    total_tokens: Annotated[int, add]
    total_cost: Annotated[float, add]

    # Search results
    search_queries: list[str]
    search_results: list[dict]

    # Output
    final_report: str | None

    # Status
    status: str  # "running", "complete", "error", "needs_human"
    error_message: str | None


# Initialize state
initial_state = ProductionState(
    task="Research the latest developments in quantum computing",
    messages=[HumanMessage(content="Research quantum computing")],
    current_step="planning",
    steps_completed=[],
    attempts=0,
    max_attempts=3,
    total_tokens=0,
    total_cost=0.0,
    search_queries=[],
    search_results=[],
    final_report=None,
    status="running",
    error_message=None
)

# Node updates only what it needs to
def planning_node(state: ProductionState) -> dict:
    """Plan the research approach."""
    # Node does work...
    queries = ["quantum computing 2024", "quantum algorithms latest"]

    # Return only updates (partial state)
    return {
        "search_queries": queries,
        "current_step": "searching",
        "steps_completed": state["steps_completed"] + ["planning"],
        "total_tokens": 150,  # This gets added to existing total
    }
After planning_node runs, state looks like:
{
     "task": "Research the latest developments in quantum computing",
     "messages": [HumanMessage(...)],
     "current_step": "searching",  # ← Updated
     "steps_completed": ["planning"],  # ← Updated
     "attempts": 0,
     "max_attempts": 3,
     "total_tokens": 150,  # ← Accumulated (was 0, now 150)
     "total_cost": 0.0,
     "search_queries": ["quantum computing 2024", ...],  # ← Updated
     "search_results": [],
     "final_report": None,
     "status": "running",
     "error_message": None
}
Key insights:
- Nodes return partial updates: Only the fields that changed
- Reducers merge intelligently:
total_tokensaccumulates,current_stepreplaces - State is always complete: Even if a node only updates one field, you get the full state
- Observable at every step: Inspect state after each node to see what happened
Nodes (Single-Purpose Workers / State Transformers)
Nodes transform state. That’s it. They receive state, do work, return updates. A well-designed node:
- Has a single, clear purpose
- Receives full state
- Returns partial updates
- Is stateless (no instance variables)
- Is deterministic (when possible)
The Anatomy of a Good Node through Python Code
from typing import TypedDict

def good_node(state: AgentState) -> dict:
    """
    A well-designed node:
    1. Has a single, clear purpose
    2. Receives full state
    3. Returns partial updates
    4. Is stateless (no instance variables)
    5. Is deterministic (when possible)
    """

    # 1. Extract what you need from state
    current_task = state["task"]
    messages = state["messages"]
    attempts = state["attempts"]

    # 2. Do ONE thing well
    result = perform_specific_work(current_task, messages)

    # 3. Return only what changed
    return {
        "current_step": "next_step",
        "attempts": attempts + 1,
        "result_data": result,
    }

    # LangGraph merges this with existing state using reducers
The Three Core Node Patterns
Every production agent uses these three patterns. Master them and you’re 80% there.
Pattern 1: LLM Decision Node
Purpose: Let the LLM decide what to do next.
from langchain_openai import ChatOpenAI
from langchain_core.messages import SystemMessage

llm = ChatOpenAI(model="gpt-4o", temperature=0)

# Define tools the LLM can use
from langchain_core.tools import tool

@tool
def search_web(query: str) -> str:
    """Search the web for information."""
    # Implementation here
    return f"Search results for: {query}"

@tool
def calculate(expression: str) -> float:
    """Evaluate a mathematical expression."""
    # Implementation here
    return eval(expression)

tools = [search_web, calculate]

def agent_decision(state: AgentState) -> dict:
    """
    LLM decides: call a tool, or provide final answer?

    Returns:
        - New AI message with tool calls OR final answer
        - Updated current_step
    """
    messages = state["messages"]

    # Add system message for context
    system_msg = SystemMessage(content="""
    You are a helpful research assistant.
    Use tools when you need information or calculations.
    Provide a final answer when you have enough information.
    """)

    # Bind tools and invoke
    llm_with_tools = llm.bind_tools(tools)
    response = llm_with_tools.invoke([system_msg] + list(messages))

    # Return updates
    return {
        "messages": [response],  # add_messages appends this
        "current_step": "routing",
        "total_tokens": response.response_metadata.get("token_usage", {}).get("total_tokens", 0),
    }
What this node produces:
If LLM wants to call a tool:
AIMessage(content="", tool_calls=[{"name": "search_web", "args": {"query": "..."}}])If LLM has final answer:
AIMessage(content="Based on the information, here's the answer...")Why this is its own node:
- Checkpoint after LLM decision but before executing tools
- If tool execution fails, retry tools without re-prompting LLM
- Log what LLM decided vs. what actually happened
- Swap LLM models without touching tool execution
Pattern 2: Tool Execution Node
Purpose: Execute the tools the LLM decided to call.
from langgraph.prebuilt import ToolNode

# Option 1: Use the built-in ToolNode (recommended)
tool_node = ToolNode(tools)

# The ToolNode automatically:
# 1. Extracts tool calls from last message
# 2. Executes them (in parallel when possible)
# 3. Handles errors gracefully
# 4. Returns ToolMessage objects

# Option 2: Custom tool execution with error handling
def custom_tool_execution(state: AgentState) -> dict:
    """
    Execute tools with custom error handling and retry logic.
    """
    messages = state["messages"]
    last_message = messages[-1]

    tool_messages = []

    for tool_call in last_message.tool_calls:
        try:
            # Find the tool
            tool_name = tool_call["name"]
            tool_args = tool_call["args"]
            tool_func = {t.name: t for t in tools}[tool_name]

            # Execute
            result = tool_func.invoke(tool_args)

            # Create success message
            tool_messages.append(ToolMessage(
                content=str(result),
                tool_call_id=tool_call["id"],
                name=tool_name,
            ))

        except Exception as e:
            # Create error message
            tool_messages.append(ToolMessage(
                content=f"Error executing {tool_name}: {str(e)}",
                tool_call_id=tool_call["id"],
                name=tool_name,
                additional_kwargs={"error": True},
            ))

    return {
        "messages": tool_messages,
        "current_step": "decision",  # Loop back to LLM
    }
Why this is its own node:
- Tool execution can fail independently of LLM
- Different retry strategies: exponential backoff for tools, model switching for LLM
- Parallel execution when possible
- Rate limiting per tool
- Checkpoint after tools complete
Pattern 3: Validation Node
Purpose: Check if we’re done or need to retry.
def validate_result(state: AgentState) -> dict:
    """
    Validate the agent's output.

    Checks:
    1. Do we have a final answer?
    2. Is it high quality?
    3. Does it address the original task?
    """
    messages = state["messages"]
    task = state["task"]
    attempts = state["attempts"]
    max_attempts = state["max_attempts"]

    # Get last message
    last_message = messages[-1]

    # Check 1: Is there content (not just tool calls)?
    if not last_message.content:
        return {
            "status": "needs_retry",
            "error_message": "No final answer provided",
            "attempts": attempts + 1,
        }

    # Check 2: Minimum length
    if len(last_message.content) < 50:
        return {
            "status": "needs_retry",
            "error_message": "Answer too brief",
            "attempts": attempts + 1,
        }

    # Check 3: Contains key terms from task
    task_keywords = set(task.lower().split())
    answer_keywords = set(last_message.content.lower().split())
    overlap = len(task_keywords & answer_keywords)

    if overlap < 2:
        return {
            "status": "needs_retry",
            "error_message": "Answer doesn't address task",
            "attempts": attempts + 1,
        }

    # All checks passed
    return {
        "status": "complete",
        "final_answer": last_message.content,
    }


# Advanced: LLM-based validation
def llm_validate_result(state: AgentState) -> dict:
    """Use an LLM to validate quality."""
    messages = state["messages"]
    task = state["task"]
    last_message = messages[-1]

    validation_prompt = f"""
    Task: {task}

    Agent's answer: {last_message.content}

    Is this answer:
    1. Complete (addresses all parts of the task)?
    2. Accurate (based on the tool results)?
    3. Well-structured and clear?

    Respond with JSON:
    {{"valid": true/false, "reason": "explanation"}}
    """

    validator_llm = ChatOpenAI(model="gpt-4o", temperature=0)
    validation = validator_llm.invoke([HumanMessage(content=validation_prompt)])

    import json
    result = json.loads(validation.content)

    if result["valid"]:
        return {
            "status": "complete",
            "final_answer": last_message.content,
        }
    else:
        return {
            "status": "needs_retry",
            "error_message": f"Validation failed: {result['reason']}",
            "attempts": state["attempts"] + 1,
        }
Why this is its own node:
- Validation logic is independent and swappable
- Start simple (basic checks), upgrade to LLM validation
- Add human validation for critical tasks
- Test validation separately from decision/execution
Edges (Control Flow)
Edges connect nodes and control flow. They’re what makes graphs more powerful than chains.
Static Edges: Fixed Paths
from langgraph.graph import StateGraph, END

graph = StateGraph(AgentState)

# Add nodes
graph.add_node("plan", planning_node)
graph.add_node("execute", execution_node)
graph.add_node("summarize", summary_node)

# Static edges: always go from A → B
graph.add_edge("plan", "execute")      # After planning, always execute
graph.add_edge("execute", "summarize") # After executing, always summarize
graph.add_edge("summarize", END)       # After summarizing, we're done
Use static edges when the next step is always the same.
Conditional Edges: Decision Points
This is where the power comes in.
def route_after_decision(state: AgentState) -> str:
    """
    Routing logic: decide which node runs next.

    Returns a string that maps to a node name.
    """
    messages = state["messages"]
    last_message = messages[-1]

    # Decision point: did LLM call tools?
    if hasattr(last_message, "tool_calls") and last_message.tool_calls:
        return "execute_tools"
    else:
        return "validate"

# Add conditional edge
graph.add_conditional_edges(
    "agent_decision",         # From this node
    route_after_decision,     # Use this function to decide
    {
        "execute_tools": "tools",    # Map return value → node
        "validate": "validate",      # Map return value → node
    }
)
The routing function: - Receives full state - Returns a string - String maps to next node via the dictionary
Common Routing Patterns
Pattern 1: Binary Decision (Retry or Give Up)
def should_retry(state: AgentState) -> str:
    """Check if we should retry or fail."""
    if state["attempts"] < state["max_attempts"]:
        return "retry"
    return "give_up"

graph.add_conditional_edges(
    "validate",
    should_retry,
    {
        "retry": "agent_decision",  # Loop back
        "give_up": "error_handler", # Handle failure
    }
)
Pattern 2: Multi-Way Routing (Task Type)
def route_by_task_type(state: AgentState) -> str:
    """Route to specialized nodes based on task type."""
    task = state["task"].lower()

    if "search" in task or "find" in task:
        return "search_specialist"
    elif "analyze" in task or "compare" in task:
        return "analysis_specialist"
    elif "write" in task or "create" in task:
        return "generation_specialist"
    else:
        return "general_agent"

graph.add_conditional_edges(
    "task_classifier",
    route_by_task_type,
    {
        "search_specialist": "search_node",
        "analysis_specialist": "analysis_node",
        "generation_specialist": "generation_node",
        "general_agent": "general_node",
    }
)
Pattern 4: Tool Call Routing
This is the most common pattern in agentic systems: “did the LLM decide to use tools, or does it have a final answer?”
def route_tools(state: AgentState) -> str:
    """Route based on whether LLM wants to use tools."""
    messages = state["messages"]
    last_message = messages[-1]

    if hasattr(last_message, 'tool_calls') and last_message.tool_calls:
        return "tools"
    return "end"

graph.add_conditional_edges(
    "agent",
    route_tools,
    {
        "tools": "tool_execution",
        "end": END
    }
)
Pattern 5: Validation-Based Routing
This pattern implements quality loops: try, validate, retry if needed. Essential for any agent that needs to meet quality standards.
def route_validation(state: AgentState) -> str:
    """Route based on validation outcome."""
    is_valid = state.get("validation_passed", False)
    attempts = state.get("attempts", 0)

    if is_valid:
        return "success"
    elif attempts < 3:
        return "retry"
    else:
        return "fail"

graph.add_conditional_edges(
    "validate",
    route_validation,
    {
        "success": "finalize",
        "retry": "agent",  # Loop back to try again
        "fail": "error_handler"
    }
)
Pattern 6: Error Handling
Different errors need different handling. Don’t treat all failures the same way.
def route_by_error_type(state: AgentState) -> str:
    """Route based on error type and severity."""
    error = state.get("error_message", "")

    if "rate_limit" in error.lower():
        return "backoff"  # Wait and retry
    elif "authentication" in error.lower():
        return "refresh_auth"  # Refresh credentials
    elif "not_found" in error.lower():
        return "fallback"  # Try alternative approach
    elif state["attempts"] < state["max_attempts"]:
        return "retry"  # Generic retry
    else:
        return "fail"  # Give up

graph.add_conditional_edges(
    "error_handler",
    route_by_error_type,
    {
        "backoff": "exponential_backoff",
        "refresh_auth": "auth_refresh",
        "fallback": "alternative_approach",
        "retry": "main_workflow",
        "fail": "failure_node"
    }
)
Pattern 7: Multi-Stage Workflow
This pattern routes through a sequence of stages, where each stage does different work and might have different retry logic.
def route_workflow_stage(state: AgentState) -> str:
    """Route through multi-stage workflow."""
    stage = state["current_stage"]

    stage_map = {
        "research": "research_node",
        "analysis": "analysis_node",
        "synthesis": "synthesis_node",
        "review": "review_node"
    }

    return stage_map.get(stage, END)

graph.add_conditional_edges(
    "coordinator",
    route_workflow_stage,
    {
        "research_node": "research_node",
        "analysis_node": "analysis_node",
        "synthesis_node": "synthesis_node",
        "review_node": "review_node",
        END: END
    }
)
Pattern 8: Parallel Execution
Sometimes you need to do multiple things at once: make several API calls, process multiple documents, query multiple databases. Static routing does this sequentially. Parallel routing does it concurrently. LangGraph supports parallel node execution using Send:
from langgraph.graph import Send

def route_parallel(state: AgentState) -> list[Send]:
    """Execute multiple nodes in parallel."""
    tasks = state["tasks"]

    # Send each task to a worker node
    return [
        Send("worker", {"task": task, "task_id": i})
        for i, task in enumerate(tasks)
    ]

graph.add_conditional_edges(
    "dispatcher",
    route_parallel
)
Part 2: Execution Flow and Core Agent Pattern
Execution Flow (Putting It All Together)
Let’s build a complete agent from scratch.
from typing import TypedDict, Annotated, Sequence
from langchain_core.messages import BaseMessage, HumanMessage, SystemMessage
from langchain_openai import ChatOpenAI
from langgraph.graph import StateGraph, END, add_messages
from langgraph.prebuilt import ToolNode
from langchain_core.tools import tool
from operator import add

# 1. DEFINE STATE
class ResearchAgentState(TypedDict):
    """State for a research agent."""
    messages: Annotated[Sequence[BaseMessage], add_messages]
    task: str
    current_step: str
    attempts: int
    max_attempts: int
    total_tokens: Annotated[int, add]
    final_answer: str | None
    status: str

# 2. DEFINE TOOLS
@tool
def search_web(query: str) -> str:
    """Search the web for information."""
    # Mock implementation
    return f"Search results for '{query}': Recent advances in quantum computing include..."

@tool
def get_academic_papers(topic: str) -> str:
    """Get recent academic papers on a topic."""
    # Mock implementation
    return f"Recent papers on '{topic}': Paper 1: Title..., Paper 2: Title..."

tools = [search_web, get_academic_papers]

# 3. DEFINE NODES
llm = ChatOpenAI(model="gpt-4o", temperature=0)

def agent_decision(state: ResearchAgentState) -> dict:
    """LLM decides what to do next."""
    messages = state["messages"]

    system_prompt = SystemMessage(content="""
    You are a research assistant. Use the available tools to gather information.
    When you have enough information, provide a comprehensive answer.
    """)

    llm_with_tools = llm.bind_tools(tools)
    response = llm_with_tools.invoke([system_prompt] + list(messages))

    return {
        "messages": [response],
        "current_step": "routing",
        "total_tokens": 100,  # Mock token count
    }

tool_node = ToolNode(tools)

def validate_result(state: ResearchAgentState) -> dict:
    """Check if we have a good answer."""
    messages = state["messages"]
    last_message = messages[-1]
    attempts = state["attempts"]

    # Check if we have an answer
    if not last_message.content or len(last_message.content) < 100:
        return {
            "status": "needs_retry",
            "attempts": attempts + 1,
        }

    return {
        "status": "complete",
        "final_answer": last_message.content,
    }

# 4. DEFINE ROUTING
def route_after_decision(state: ResearchAgentState) -> str:
    """Route based on LLM decision."""
    last_message = state["messages"][-1]

    if hasattr(last_message, "tool_calls") and last_message.tool_calls:
        return "execute"
    return "validate"

def route_after_validation(state: ResearchAgentState) -> str:
    """Route based on validation result."""
    if state["status"] == "complete":
        return "end"
    elif state["attempts"] < state["max_attempts"]:
        return "retry"
    return "end"  # Max attempts reached

# 5. BUILD GRAPH
graph = StateGraph(ResearchAgentState)

# Add nodes
graph.add_node("decide", agent_decision)
graph.add_node("execute", tool_node)
graph.add_node("validate", validate_result)

# Set entry point
graph.set_entry_point("decide")

# Add edges
graph.add_conditional_edges(
    "decide",
    route_after_decision,
    {
        "execute": "execute",
        "validate": "validate",
    }
)

graph.add_edge("execute", "decide")  # Loop back after tools

graph.add_conditional_edges(
    "validate",
    route_after_validation,
    {
        "end": END,
        "retry": "decide",
    }
)

# 6. COMPILE
app = graph.compile()

# 7. RUN
initial_state = {
    "messages": [HumanMessage(content="What are the latest developments in quantum computing?")],
    "task": "Research quantum computing",
    "current_step": "start",
    "attempts": 0,
    "max_attempts": 3,
    "total_tokens": 0,
    "final_answer": None,
    "status": "running",
}

# Execute
final_state = app.invoke(initial_state)

print("Final Answer:", final_state["final_answer"])
print("Total Tokens:", final_state["total_tokens"])
print("Attempts:", final_state["attempts"])
What Happens When This Runs
Execution trace:
Step 1: DECIDE node
  Input state: initial_state
  LLM decides to call search_web tool
  Output: {"messages": [AIMessage with tool_call], ...}
  Router: sees tool_calls → routes to EXECUTE

Step 2: EXECUTE node
  Input state: updated state with tool_call
  Runs search_web("quantum computing")
  Output: {"messages": [ToolMessage with results], ...}
  Static edge → routes to DECIDE

Step 3: DECIDE node (again)
  Input state: state with search results
  LLM sees results, decides to call get_academic_papers
  Output: {"messages": [AIMessage with tool_call], ...}
  Router: sees tool_calls → routes to EXECUTE

Step 4: EXECUTE node (again)
  Input state: state with new tool_call
  Runs get_academic_papers("quantum computing")
  Output: {"messages": [ToolMessage with papers], ...}
  Static edge → routes to DECIDE

Step 5: DECIDE node (third time)
  Input state: state with all research data
  LLM has enough info, provides final answer
  Output: {"messages": [AIMessage with answer], ...}
  Router: no tool_calls → routes to VALIDATE

Step 6: VALIDATE node
  Input state: state with final answer
  Checks answer quality (length > 100)
  Passes validation
  Output: {"status": "complete", "final_answer": "..."}
  Router: status == "complete" → routes to END

Step 7: END
  Execution stops, returns final state
Key observations:
- State flows through: Each node receives complete state, returns partial updates
- Routing is explicit: You can see exactly why each node was chosen
- Loops work naturally: DECIDE ↔︎ EXECUTE loop runs until LLM is satisfied
- Checkpointing is implicit: After each node, state is saved
- Observable: You could log state after each node to see evolution
Core Agent Pattern (Decide → Execute → Validate)
This is the heartbeat of production AI agents. Master this pattern and you’ve mastered 80% of what you need to build real-world agentic systems.
Every LangGraph agent, from simple task executors to complex research systems, follows this same three-node loop. It’s not arbitrary—this pattern emerged from thousands of production deployments as the optimal balance between flexibility and control.

The Three Nodes
1. DECIDE (The Brain)
The LLM Decision Node is where your agent thinks. It looks at everything that’s happened so far—the conversation history, tool results, previous attempts—and decides what to do next.
from langchain_openai import ChatOpenAI
from langchain_core.messages import SystemMessage

llm = ChatOpenAI(model="gpt-4o", temperature=0)

def decide_node(state: AgentState) -> dict:
    """
    The brain: LLM decides the next action.

    Possible outcomes:
    1. Call a tool (search, calculate, email, etc.)
    2. Provide a final answer
    3. Ask for clarification
    """
    messages = state["messages"]

    # Context for the LLM
    system_msg = SystemMessage(content="""
    You are a helpful assistant with access to tools.
    Use tools when you need information or to take actions.
    When you have enough information, provide a clear final answer.
    """)

    # Bind tools and get decision
    llm_with_tools = llm.bind_tools(tools)
    response = llm_with_tools.invoke([system_msg] + list(messages))

    # Return state updates
    return {
        "messages": [response],
        "current_step": "routing",
    }
What this node does:
- Reads the entire conversation history from
state["messages"] - Considers available tools and their descriptions
- Makes a decision: call a tool OR provide a final answer
- Returns an AIMessage with either
tool_calls(actions to take) orcontent(final answer)
Why this is separate from execution: You want to checkpoint after the LLM decides but before executing tools. If a tool fails (network timeout, API error, rate limit), you can retry just the tool without burning tokens on another LLM call. In production, separating decision from execution cuts costs by 30-40% on retry scenarios.
2. EXECUTE (The Hands)
The Tool Execution Node does what the LLM decided. If the LLM said “search for X,” this node runs the search. If it said “calculate Y,” this node runs the calculation.
from langgraph.prebuilt import ToolNode
from langchain_core.tools import tool

# Define tools
@tool
def search_web(query: str) -> str:
    """Search the web for current information."""
    # Implementation here
    return f"Search results for: {query}"

@tool
def calculator(expression: str) -> float:
    """Evaluate a mathematical expression."""
    import ast
    import operator

    # Safe evaluation of math expressions
    ops = {
        ast.Add: operator.add,
        ast.Sub: operator.sub,
        ast.Mult: operator.mul,
        ast.Div: operator.truediv,
    }

    def eval_expr(node):
        if isinstance(node, ast.Num):
            return node.n
        elif isinstance(node, ast.BinOp):
            return ops[type(node.op)](eval_expr(node.left), eval_expr(node.right))
        raise ValueError(f"Unsupported expression: {node}")

    tree = ast.parse(expression, mode='eval')
    return eval_expr(tree.body)

tools = [search_web, calculator]

# Use LangGraph's built-in ToolNode
execute_node = ToolNode(tools)

# That's it! ToolNode automatically:
# - Extracts tool calls from the last message
# - Executes them (in parallel when possible)
# - Handles errors gracefully
# - Returns ToolMessage objects with results
What ToolNode does automatically:
Looks at the last message in
state["messages"]Finds all
tool_callsin that messageFor each tool call:
- Matches the tool name to your tool functions
- Extracts the arguments
- Executes the tool (with error handling)
- Creates a ToolMessage with the result
Returns all ToolMessages to add to state
Why this is separate from decision: Tool execution has different failure modes than LLM calls. Network timeouts, API rate limits, invalid parameters—these need different retry strategies. By isolating tool execution, you can:
- Retry failed tools without re-running the LLM
- Implement per-tool rate limiting
- Run multiple tools in parallel
- Add tool-specific error handling
3. VALIDATE (The Quality Control)
The Validation Node checks if we’re done or need to try again. This is what separates toy demos from production systems.
def validate_node(state: AgentState) -> dict:
    """
    Quality control: are we done?

    Checks:
    1. Do we have a final answer?
    2. Is it high quality?
    3. Does it address the original task?
    """
    messages = state["messages"]
    task = state["task"]
    attempts = state["attempts"]
    max_attempts = state["max_attempts"]

    last_message = messages[-1]

    # Check 1: Is there content (not just tool calls)?
    if not last_message.content:
        return {
            "status": "needs_retry",
            "error_message": "No final answer provided",
            "attempts": attempts + 1,
        }

    # Check 2: Minimum quality bar (length check)
    if len(last_message.content) < 100:
        return {
            "status": "needs_retry",
            "error_message": "Answer too brief, needs more detail",
            "attempts": attempts + 1,
        }

    # Check 3: Relevance check (basic keyword matching)
    task_words = set(task.lower().split())
    answer_words = set(last_message.content.lower().split())
    overlap = len(task_words & answer_words)

    if overlap < 2:
        return {
            "status": "needs_retry",
            "error_message": "Answer doesn't address the original task",
            "attempts": attempts + 1,
        }

    # All checks passed!
    return {
        "status": "complete",
        "final_answer": last_message.content,
    }
What makes good validation:
Start simple, then upgrade:
Level 1: Basic checks (shown above)
- Does an answer exist?
- Is it long enough?
- Does it contain task keywords?
Level 2: LLM-based validation
def llm_validate_node(state: AgentState) -> dict:
    """Use an LLM to judge quality."""
    validator = ChatOpenAI(model="gpt-4o-mini", temperature=0)

    validation_prompt = f"""
    Task: {state['task']}
    Answer: {state['messages'][-1].content}

    Is this answer:
    1. Complete (addresses all parts)?
    2. Accurate (based on tool results)?
    3. Well-structured?

    Respond with JSON: {{"valid": true/false, "reason": "..."}}
    """

    result = validator.invoke([HumanMessage(content=validation_prompt)])

    import json
    validation = json.loads(result.content)

    if validation["valid"]:
        return {"status": "complete", "final_answer": state["messages"][-1].content}
    else:
        return {
            "status": "needs_retry",
            "error_message": f"Validation failed: {validation['reason']}",
            "attempts": state["attempts"] + 1,
        }
Level 3: Human validation (for critical decisions)
def human_validate_node(state: AgentState) -> dict:
    """Pause for human review."""
    return {
        "status": "needs_human_review",
        "current_step": "awaiting_approval",
    }

# Use with interrupt_before in compilation:
# app = graph.compile(checkpointer=memory, interrupt_before=["validate"])
Why validation is its own node: You want to swap validation strategies without touching decision or execution logic. Start with basic checks in development, upgrade to LLM validation in staging, add human review for production. By keeping validation separate, these changes don’t ripple through your entire codebase.
The Routing Logic
Now let’s connect these three nodes with conditional edges. This is where the pattern comes alive.
from langgraph.graph import StateGraph, END
from typing import Annotated, Sequence
from langchain_core.messages import BaseMessage
from langgraph.graph import add_messages

# State definition
class AgentState(TypedDict):
    messages: Annotated[Sequence[BaseMessage], add_messages]
    task: str
    current_step: str
    attempts: int
    max_attempts: int
    status: str
    final_answer: str | None
    error_message: str | None

# Build the graph
graph = StateGraph(AgentState)

# Add the three core nodes
graph.add_node("decide", decide_node)
graph.add_node("execute", execute_node)
graph.add_node("validate", validate_node)

# Set entry point
graph.set_entry_point("decide")
Router 1: After DECIDE - Tool calls present?
def route_after_decide(state: AgentState) -> str:
    """
    Decision point: did the LLM call tools or provide an answer?

    Returns:
        "execute" - if tool calls present
        "validate" - if final answer provided
    """
    last_message = state["messages"][-1]

    # Check for tool calls
    if hasattr(last_message, "tool_calls") and last_message.tool_calls:
        return "execute"

    # No tools means we have a final answer
    return "validate"

graph.add_conditional_edges(
    "decide",
    route_after_decide,
    {
        "execute": "execute",
        "validate": "validate",
    }
)
This router implements the first branching logic: if the LLM wants to use tools, go execute them. If the LLM provided a final answer, skip execution and validate it.
Always loop back after EXECUTE
# After executing tools, ALWAYS return to DECIDE
graph.add_edge("execute", "decide")
This is the core loop. After tools run, the LLM needs to see the results and decide what to do next. Maybe it needs more information (call another tool). Maybe it has enough to answer. The LLM decides based on the tool results now in the message history.
This loop runs as many times as needed:
- LLM: “Search for X” → Execute → Results added
- LLM: “Search for Y too” → Execute → More results added
- LLM: “Calculate Z” → Execute → Calculation added
- LLM: “Here’s the answer based on all that data” → Validate
Router 2: After VALIDATE - Valid and complete?
def route_after_validate(state: AgentState) -> str:
    """
    Decision point: is the answer good enough?

    Returns:
        "end" - if complete or max attempts reached
        "retry" - if invalid and retries remaining
    """
    status = state["status"]

    # Success case
    if status == "complete":
        return "end"

    # Check retry budget
    if state["attempts"] < state["max_attempts"]:
        return "retry"

    # Max attempts exhausted
    return "end"

graph.add_conditional_edges(
    "validate",
    route_after_validate,
    {
        "end": END,
        "retry": "decide",
    }
)
This router implements the retry loop: if validation fails but we have attempts left, loop back to DECIDE. The LLM will see the validation error in the message history and try a different approach. If we hit max attempts, gracefully exit even if the answer isn’t perfect.
Router 3: After second validation check - Retries left?
This is shown in the diagram but handled within Router 2 above. The logic is:
- If valid → END (success path)
- If invalid but attempts < max → retry (back to DECIDE)
- If invalid and attempts >= max → END (failure path, but fail gracefully)
Compile and Execute
# Compile the graph
app = graph.compile()

# Run it
initial_state = {
    "messages": [HumanMessage(content="What's the weather in San Francisco and what's 15% of 72?")],
    "task": "Weather and calculation query",
    "current_step": "start",
    "attempts": 0,
    "max_attempts": 3,
    "status": "running",
    "final_answer": None,
    "error_message": None,
}

final_state = app.invoke(initial_state)

print("Final Answer:", final_state["final_answer"])
print("Total Attempts:", final_state["attempts"])
Execution Trace: Following the Flow
Let’s trace what happens when you run this agent:
Iteration 1: First Tool Call
1. DECIDE node
   - LLM sees: "What's the weather in SF and what's 15% of 72?"
   - Decision: Call search_web("weather San Francisco")
   - State update: messages += [AIMessage(tool_calls=[...])]

2. Router 1: Tool calls present? YES
   - Route to EXECUTE

3. EXECUTE node
   - Runs search_web tool
   - Gets: "Current weather: 65°F, partly cloudy"
   - State update: messages += [ToolMessage(content="Current weather...")]

4. Static edge: Always back to DECIDE
Iteration 2: Second Tool Call
5. DECIDE node
   - LLM sees: original question + weather results
   - Decision: Still need to calculate 15% of 72
   - Calls calculator("72 * 0.15")
   - State update: messages += [AIMessage(tool_calls=[...])]

6. Router 1: Tool calls present? YES
   - Route to EXECUTE

7. EXECUTE node
   - Runs calculator tool
   - Gets: 10.8
   - State update: messages += [ToolMessage(content="10.8")]

8. Static edge: Back to DECIDE
Iteration 3: Final Answer
9. DECIDE node
   - LLM sees: question + weather + calculation
   - Decision: Have all info, provide answer
   - Response: "The weather in SF is 65°F and partly cloudy. 15% of 72 is 10.8."
   - State update: messages += [AIMessage(content="The weather...")]

10. Router 1: Tool calls present? NO
    - Route to VALIDATE

11. VALIDATE node
    - Check 1: Content exists? YES
    - Check 2: Length > 100? YES (assuming full answer)
    - Check 3: Keywords present? YES ("weather", "72")
    - State update: status = "complete", final_answer = "..."

12. Router 2: Valid and complete? YES
    - Route to END

13. END: Return final state
Why This Pattern Works in Production
Separation of Concerns
- Decision logic in DECIDE
- Execution logic in EXECUTE
- Validation logic in VALIDATE
- Change one without touching others
Retry at the Right Level
- LLM errors? Retry from DECIDE
- Tool errors? Retry from EXECUTE
- Quality issues? Retry the whole loop
- Each failure mode has the right recovery strategy
Observable Execution Every step is explicit:
# Add logging to see what's happening
def decide_node(state: AgentState) -> dict:
    print(f"[DECIDE] Attempt {state['attempts']}")
    result = # ... node logic
    print(f"[DECIDE] Decision: {result}")
    return result
You can see exactly what the agent is thinking at each step. No black boxes.
Checkpointed Progress
from langgraph.checkpoint.memory import MemorySaver

memory = MemorySaver()
app = graph.compile(checkpointer=memory)

# If execution crashes after EXECUTE, resume from DECIDE
# The tool results are already in state—no duplicate work
After each node, state is saved. If the system crashes, you resume from the last successful checkpoint. This prevents duplicate LLM calls and duplicate tool executions, saving both time and money.
Built-in Quality Loops
The retry mechanism is explicit: - Validation fails → increment attempts → loop back - Max attempts reached → stop gracefully - No infinite loops, no hanging processes
Flexible and Extensible
Need human-in-the-loop? Add it at VALIDATE:
app = graph.compile(
    checkpointer=memory,
    interrupt_before=["validate"]  # Pause here
)
Need different validation for different tasks? Replace the node:
graph.add_node("validate_code", code_validator)
graph.add_node("validate_writing", writing_validator)

# Route based on task type
def route_to_validator(state):
    return "validate_code" if "code" in state["task"] else "validate_writing"
Key Takeaways
This three-node pattern is the foundation. Real production agents add more nodes (planning, formatting, error handling, human review), but the core loop stays the same: decide what to do, do it, check if it’s good enough.
The routers are critical. Static edges (EXECUTE → DECIDE) create the tool-use loop. Conditional edges (after DECIDE, after VALIDATE) implement branching and retry logic. Together, they give you full control over agent behavior.
State flows through everything. Each node receives complete state, returns partial updates. Reducers merge the updates. The result is always a complete, consistent state you can inspect at any point.
Checkpointing is invisible but essential. After each node, state is saved. If anything fails, you resume from the last successful step. This isn’t something you have to think about—it just works.
Start here, then extend. Build your first agent with exactly these three nodes. Once you understand how they work together, you’ll know where to add more nodes (before DECIDE for planning, after VALIDATE for formatting, parallel to EXECUTE for concurrent operations). But you always come back to this pattern: think, act, verify.
This is production AI. Not because it’s complicated, but because it’s controlled, observable, and recoverable. That’s what separates toys from tools.
Checkpointing & Retries
This is the difference between a demo and a production system. Checkpointing saves state after each step so you can resume from failures. Retries let you handle transient errors without starting over.
In the real world, things fail. APIs timeout. Networks drop. Rate limits hit. LLMs hallucinate. If your agent can’t handle these failures gracefully, it’s not production-ready. Checkpointing and retries are how you build resilience into your agents—the ability to survive failures, learn from them, and keep going.
Think about it: if your agent spends 5 minutes and $2 in API calls getting to step 8 of a 10-step workflow, then hits a network timeout, do you really want to start over from step 1? No. You want to save progress, retry the failed step, and continue. That’s what checkpointing gives you.
Why Checkpointing Matters
Checkpointing is automatic progress saving. After each node executes, LangGraph saves the current state to a checkpointer. If execution fails, you can resume from the last successful checkpoint instead of restarting from scratch.
This isn’t just about error recovery—it’s also about human-in-the-loop workflows. Save state, wait for human approval, resume. Save state, pause for 24 hours, resume. Save state, inspect intermediate results, modify if needed, resume. None of this works without checkpointing.
Without checkpointing:
# Long workflow
graph.invoke(state)
# ❌ Network error on step 8 of 10
# Must restart from beginning
You lose all progress. The 7 successful steps? Gone. The API calls you paid for? Wasted. The intermediate results? Lost. You start over, hit the same APIs again, hope the network is better this time. This is fine for demos, unacceptable for production.
With checkpointing:
# Save state after each step
checkpointer = MemorySaver()
graph = graph.compile(checkpointer=checkpointer)

# Resume from last successful checkpoint
result = graph.invoke(state, config={"thread_id": "abc123"})
# ✅ Resumes from step 8
Now you have resilience. Step 7 succeeded and saved a checkpoint. Step 8 failed. You resume from the checkpoint, retry step 8, and continue. No lost progress, no wasted API calls, no starting over.
The thread_id is the key—it identifies this specific workflow instance. Same thread_id = same checkpoint history. Different thread_id = different workflow, different checkpoints. Think of it as a conversation ID or workflow instance ID.
Implementing Checkpointing
Checkpointing in LangGraph is straightforward: create a checkpointer, compile your graph with it, and pass a thread_id when invoking. LangGraph handles the rest—saving state after each node, loading state when resuming, managing the checkpoint history.
Basic Setup
The simplest checkpointer is MemorySaver—it stores checkpoints in memory. Great for development and testing, but checkpoints disappear when the process exits. For production, you’ll use persistent checkpointers (SQLite, PostgreSQL) that survive restarts.
from langgraph.checkpoint.memory import MemorySaver

# Create checkpointer
checkpointer = MemorySaver()

# Compile graph with checkpointing
app = graph.compile(checkpointer=checkpointer)

# Execute with thread ID (identifies the conversation/workflow)
config = {"configurable": {"thread_id": "conversation-123"}}
result = app.invoke(initial_state, config=config)
What happens here:
- Graph executes node by node
- After each node completes, LangGraph saves the current state to the checkpointer
- The checkpoint is tagged with the thread_id (“conversation-123”)
- If execution fails, you can resume by invoking with the same thread_id
The config dictionary is how you pass runtime parameters to LangGraph. The configurable key holds things like thread_id that control execution behavior. You can also pass other config like recursion limits, timeouts, etc.
Streaming with Checkpoints
Streaming execution lets you see progress as it happens, node by node. Combined with checkpointing, you get both visibility and resilience—watch the agent work in real-time, and if it fails, you can resume from the last checkpoint.
# Stream execution with automatic checkpointing
for chunk in app.stream(initial_state, config=config):
    print(f"Step: {chunk}")
    # State is automatically saved after each step
Each chunk is the output of one node execution. You can log it, display it to users, save it to a database—whatever you need. Meanwhile, LangGraph is checkpointing after each node in the background.
Why this matters: For long-running workflows, streaming gives users feedback that something is happening. For debugging, it shows you exactly where execution is in real-time. For monitoring, it lets you track progress and detect stalls.
Resuming from Checkpoint
The real power of checkpointing: resuming from where you left off. If execution fails, you don’t need to replay the entire workflow—just resume from the last checkpoint.
# Get checkpoint state
state = app.get_state(config)
print(f"Current state: {state}")

# Resume execution
result = app.invoke(None, config=config)  # None = use saved state
How resumption works:
get_state(config)retrieves the last checkpoint for this thread_id- You can inspect it, modify it, or just verify it’s what you expect
invoke(None, config)says “don’t use new initial state—load from checkpoint”- LangGraph loads the checkpoint and resumes execution from the next node
When to resume:
- After a crash or exception
- After a planned pause (human-in-the-loop)
- After inspecting intermediate state and deciding to continue
- After modifying state and wanting to retry with the changes
Pro tip: You can also get the full checkpoint history with get_state_history(config), which returns all checkpoints for this thread, not just the latest. Useful for debugging or replaying execution step by step.
Retry Mechanisms
Checkpointing handles the “save progress” part. Retries handle the “try again when things fail” part. Together, they make your agents resilient: save state, fail, retry, succeed, continue.
There are three main retry patterns, each suited to different failure modes. Simple retry counters work for flaky operations. Exponential backoff works for rate limits and overloaded services. Error-specific strategies work when different errors need different handling.
Pattern 1: Retry Counter in State
The simplest retry mechanism: track how many times you’ve tried, and give up after N attempts. Works for operations that might fail occasionally but usually succeed—network calls, flaky APIs, non-deterministic operations.
class AgentState(TypedDict):
    messages: list
    retry_count: int
    max_retries: int
    last_error: str | None

def agent_with_retry(state: AgentState) -> dict:
    try:
        # Attempt operation
        result = risky_operation()
        return {
            "messages": [result],
            "retry_count": 0  # Reset on success
        }
    except Exception as e:
        return {
            "retry_count": state["retry_count"] + 1,
            "last_error": str(e)
        }

def route_retry(state: AgentState) -> str:
    if state["retry_count"] >= state["max_retries"]:
        return "fail"
    elif state["last_error"]:
        return "retry"
    else:
        return "continue"

graph.add_conditional_edges(
    "agent",
    route_retry,
    {
        "retry": "agent",      # Loop back
        "fail": "error_handler",
        "continue": "next_step"
    }
)
How this works:
- Node tries the operation
- If it succeeds, reset retry_count to 0 and continue
- If it fails, increment retry_count and save the error
- Router checks: have we exceeded max_retries?
- If yes → route to error handler (give up)
- If no → route back to the same node (try again)
Why reset retry_count on success? Because retries are per-operation, not per-workflow. If step 3 fails twice then succeeds, and later step 7 fails, you want step 7 to get its own 3 retries. Resetting on success ensures each operation gets a fresh retry budget.
When to use this: Flaky network calls, occasional API errors, operations that usually work but sometimes don’t. Not suitable for systematic failures (bad credentials, invalid inputs) that will never succeed no matter how many times you retry.
Pattern 2: Exponential Backoff
Some failures aren’t truly random—they’re caused by temporary overload or rate limiting. Retrying immediately just hammers the struggling service. Exponential backoff waits between retries, with the wait time doubling each time: 1s, 2s, 4s, 8s, 16s.
import time
from datetime import datetime, timedelta

class AgentState(TypedDict):
    retry_count: int
    last_attempt: datetime | None
    backoff_seconds: int

def agent_with_backoff(state: AgentState) -> dict:
    # Check if we should wait before retrying
    if state["last_attempt"]:
        wait_time = timedelta(seconds=state["backoff_seconds"])
        if datetime.now() - state["last_attempt"] < wait_time:
            time.sleep(state["backoff_seconds"])

    try:
        result = risky_operation()
        return {
            "result": result,
            "retry_count": 0,
            "backoff_seconds": 1  # Reset backoff
        }
    except Exception as e:
        return {
            "retry_count": state["retry_count"] + 1,
            "last_attempt": datetime.now(),
            "backoff_seconds": min(state["backoff_seconds"] * 2, 60),  # Exponential
            "last_error": str(e)
        }
How exponential backoff works:
- First failure: wait 1 second before retry
- Second failure: wait 2 seconds
- Third failure: wait 4 seconds
- Fourth failure: wait 8 seconds
- Continues doubling up to a maximum (60 seconds here)
Why this works: It gives overloaded services time to recover. It backs off progressively so you’re not constantly hammering a rate-limited API. It’s self-adjusting—if the service recovers quickly, you retry quickly; if it’s slow to recover, you wait longer.
When to use this: Rate-limited APIs, overloaded services, database connection pools, any resource that experiences temporary capacity issues. Especially important for production systems where retry storms (thousands of clients all retrying at once) can make outages worse.
Production note: Add jitter (random variation) to backoff times to prevent thundering herd problems where all clients retry at exactly the same time. Example: instead of waiting exactly 4 seconds, wait 4 ± random(0, 1) seconds.
Pattern 3: Different Retry Strategies
Not all errors are created equal. A timeout might work if you retry. A rate limit needs exponential backoff. An authentication error needs credential refresh. Invalid input needs fixing, not retrying. Smart retry routing handles each error type appropriately.
def route_retry_strategy(state: AgentState) -> str:
    """Choose retry strategy based on error type."""
    error = state["last_error"]
    retry_count = state["retry_count"]

    if retry_count >= 5:
        return "fail"

    # Different strategies for different errors
    if "timeout" in error.lower():
        return "retry_with_backoff"
    elif "rate_limit" in error.lower():
        return "retry_with_long_wait"
    elif "invalid_input" in error.lower():
        return "fix_input_and_retry"
    else:
        return "retry_immediate"

graph.add_conditional_edges(
    "execution",
    route_retry_strategy,
    {
        "retry_with_backoff": "exponential_backoff_node",
        "retry_with_long_wait": "wait_60s_node",
        "fix_input_and_retry": "input_fixer_node",
        "retry_immediate": "execution",  # Immediate retry
        "fail": "error_handler"
    }
)
How this works:
- Operation fails and saves error message in state
- Router examines the error message to classify the error type
- Based on error type, routes to appropriate retry strategy:
- Timeout → exponential backoff (service might be slow)
- Rate limit → long wait (need to respect rate limits)
- Invalid input → fix the input before retrying
- Unknown error → immediate retry (might be transient)
Why this is better than generic retry: Because different errors have different solutions. Retrying invalid input 10 times won’t help—you need to fix the input. Immediately retrying a rate-limited request will just get you rate-limited again—you need to wait. This pattern routes each error to the appropriate recovery strategy.
Production pattern: Maintain structured error types, not just string messages. Instead of parsing “error: timeout occurred”, use error codes or exception types that you can match on reliably. Parse API error responses to extract error codes, retry-after headers, etc.
Extension: Add error-specific context to help recovery. For invalid input, save what was invalid. For rate limits, save when you can retry (from the Retry-After header). For auth errors, trigger credential refresh. Each error type gets specialized handling.
Production Checkpointing
MemorySaver is great for development, but production needs persistence. If your process crashes or restarts, memory is gone. Production checkpointers write to databases—SQLite for single-node deployments, PostgreSQL for distributed systems.
For production, use persistent checkpointers:
from langgraph.checkpoint.sqlite import SqliteSaver

# SQLite-based checkpointing
checkpointer = SqliteSaver.from_conn_string("checkpoints.db")

# PostgreSQL (for production)
from langgraph.checkpoint.postgres import PostgresSaver
checkpointer = PostgresSaver.from_conn_string("postgresql://...")

# Compile with persistent checkpointer
app = graph.compile(checkpointer=checkpointer)
SQLite vs PostgreSQL:
SQLite - Good for single-machine deployments, moderate scale, simple setup. The checkpoint database is just a file on disk. Fast, reliable, no separate database server needed. Works great up to thousands of concurrent workflows.
PostgreSQL - Required for distributed deployments, high scale, multi-region. Multiple machines can share the same checkpoint database. Supports transactions, replication, backups. Necessary when you’re running agents across multiple servers.
Benefits of persistent checkpointing:
- Survives process restarts: Deploy new code, restart servers, workflows resume automatically
- Enables distributed execution: Multiple workers can coordinate using shared checkpoint storage
- Audit trail of all state transitions: Every checkpoint is saved, so you can replay execution, debug issues, understand what happened
- Easy debugging and inspection: Query the checkpoint database to see current state of all workflows, find stuck workflows, analyze execution patterns
Production considerations:
Checkpoint retention: Decide how long to keep checkpoints. Keep them forever for audit? Delete after workflow completes? Archive old checkpoints to cold storage? Depends on your compliance and debugging needs.
Checkpoint cleanup: Implement garbage collection for completed workflows. Otherwise your checkpoint database grows unbounded as workflows complete but their checkpoints remain.
Monitoring: Track checkpoint database size, query performance, failed checkpoint saves. A slow or full checkpoint database will stall all your agents.
Backup and recovery: Checkpoint database is critical infrastructure—if you lose it, all in-flight workflows are lost. Back it up regularly.
Thread ID strategy: Use meaningful thread IDs that you can track: user-{user_id}-session-{session_id}, workflow-{workflow_id}, etc. Random UUIDs work but make debugging harder.
Key Takeaways:
Checkpointing is mandatory for production. Without it, every failure means starting over. With it, you resume from the last successful step.
Retries handle transient failures. Network blips, API timeouts, rate limits—most failures are temporary. Smart retry logic turns failures into eventual success.
Different errors need different strategies. Don’t retry everything the same way. Timeout? Backoff. Rate limit? Wait. Invalid input? Fix it. Match strategy to error type.
Use persistent checkpointers in production. Memory checkpoints vanish on restart. SQLite/PostgreSQL checkpoints survive everything.
Combine checkpointing + retries for resilience. Checkpointing saves progress. Retries handle failures. Together they make agents that work reliably in the real world.
Exercise: Build a Research Agent with Deterministic Flow
Time to build something real. You’ll create a multi-stage research agent that demonstrates everything we’ve covered: explicit state, conditional routing, checkpointing, and retry logic.
This isn’t a toy. It’s a pattern you can use for production agents—the kind that run for minutes or hours, need to handle failures gracefully, and let you see exactly what’s happening at each step.
This exercise brings together everything from this module into one working system. You’ll see how state management, nodes, edges, checkpointing, and retries combine to create a resilient, observable agent. By the end, you’ll have a complete research agent that you can actually use, modify, and deploy.
Why this exercise matters: Most tutorials show isolated features. This shows how they work together in a real system. You’ll encounter the same challenges you’d face in production: handling failures, managing state across multiple steps, deciding when to retry vs fail, and maintaining observability. The patterns you learn here apply to any complex agent workflow.
Github Codebase URL: https://github.com/ranjankumar-gh/building-real-world-agentic-ai-systems-with-langgraph-codebase/tree/main/module-03
A complete reference implementation is available at the above url. This has production-ready code demonstrating concepts learned in this chapter / module. It includes working examples, tests, and documentation. Download and run in under five minutes to see explicit state management, deterministic flow, checkpointing, and retry logic in action.
What You’re Building
A research agent that:
- Takes a research query
- Plans search queries
- Executes searches (with retry on failure)
- Validates results (loops back if insufficient)
- Synthesizes findings
- Generates a final report
With full observability, checkpointing, and error handling.
The agent workflow:
Stage 1 - Planning: The LLM analyzes your research query and breaks it down into specific search queries. Instead of searching for “quantum computing,” it generates targeted queries like “quantum computing breakthroughs 2024” and “commercial quantum computing applications.”
Stage 2 - Searching: Execute the search queries using a real search tool. Each search might succeed or fail—network issues, API limits, bad queries. The agent collects whatever results it can get.
Stage 3 - Validating: Check if we got enough valid results to proceed. If yes, move to processing. If no, increment retry counter and decide whether to retry searches or give up.
Stage 4 - Processing: Extract key findings from the search results. The LLM analyzes all the results and pulls out the most important, relevant facts.
Stage 5 - Generating: Synthesize findings into a structured report with executive summary, key points, and conclusion.
Error Handling: At any point, if something fails and we haven’t exceeded max retries, loop back and try again. If we have exceeded retries, fail gracefully with an error report.
Why this structure? Each stage is a separate node with a clear responsibility. If search fails, you retry just the search—not the planning. If validation fails, you can either retry search or adjust your validation criteria. The separation makes debugging easy and retries efficient.
The Workflow
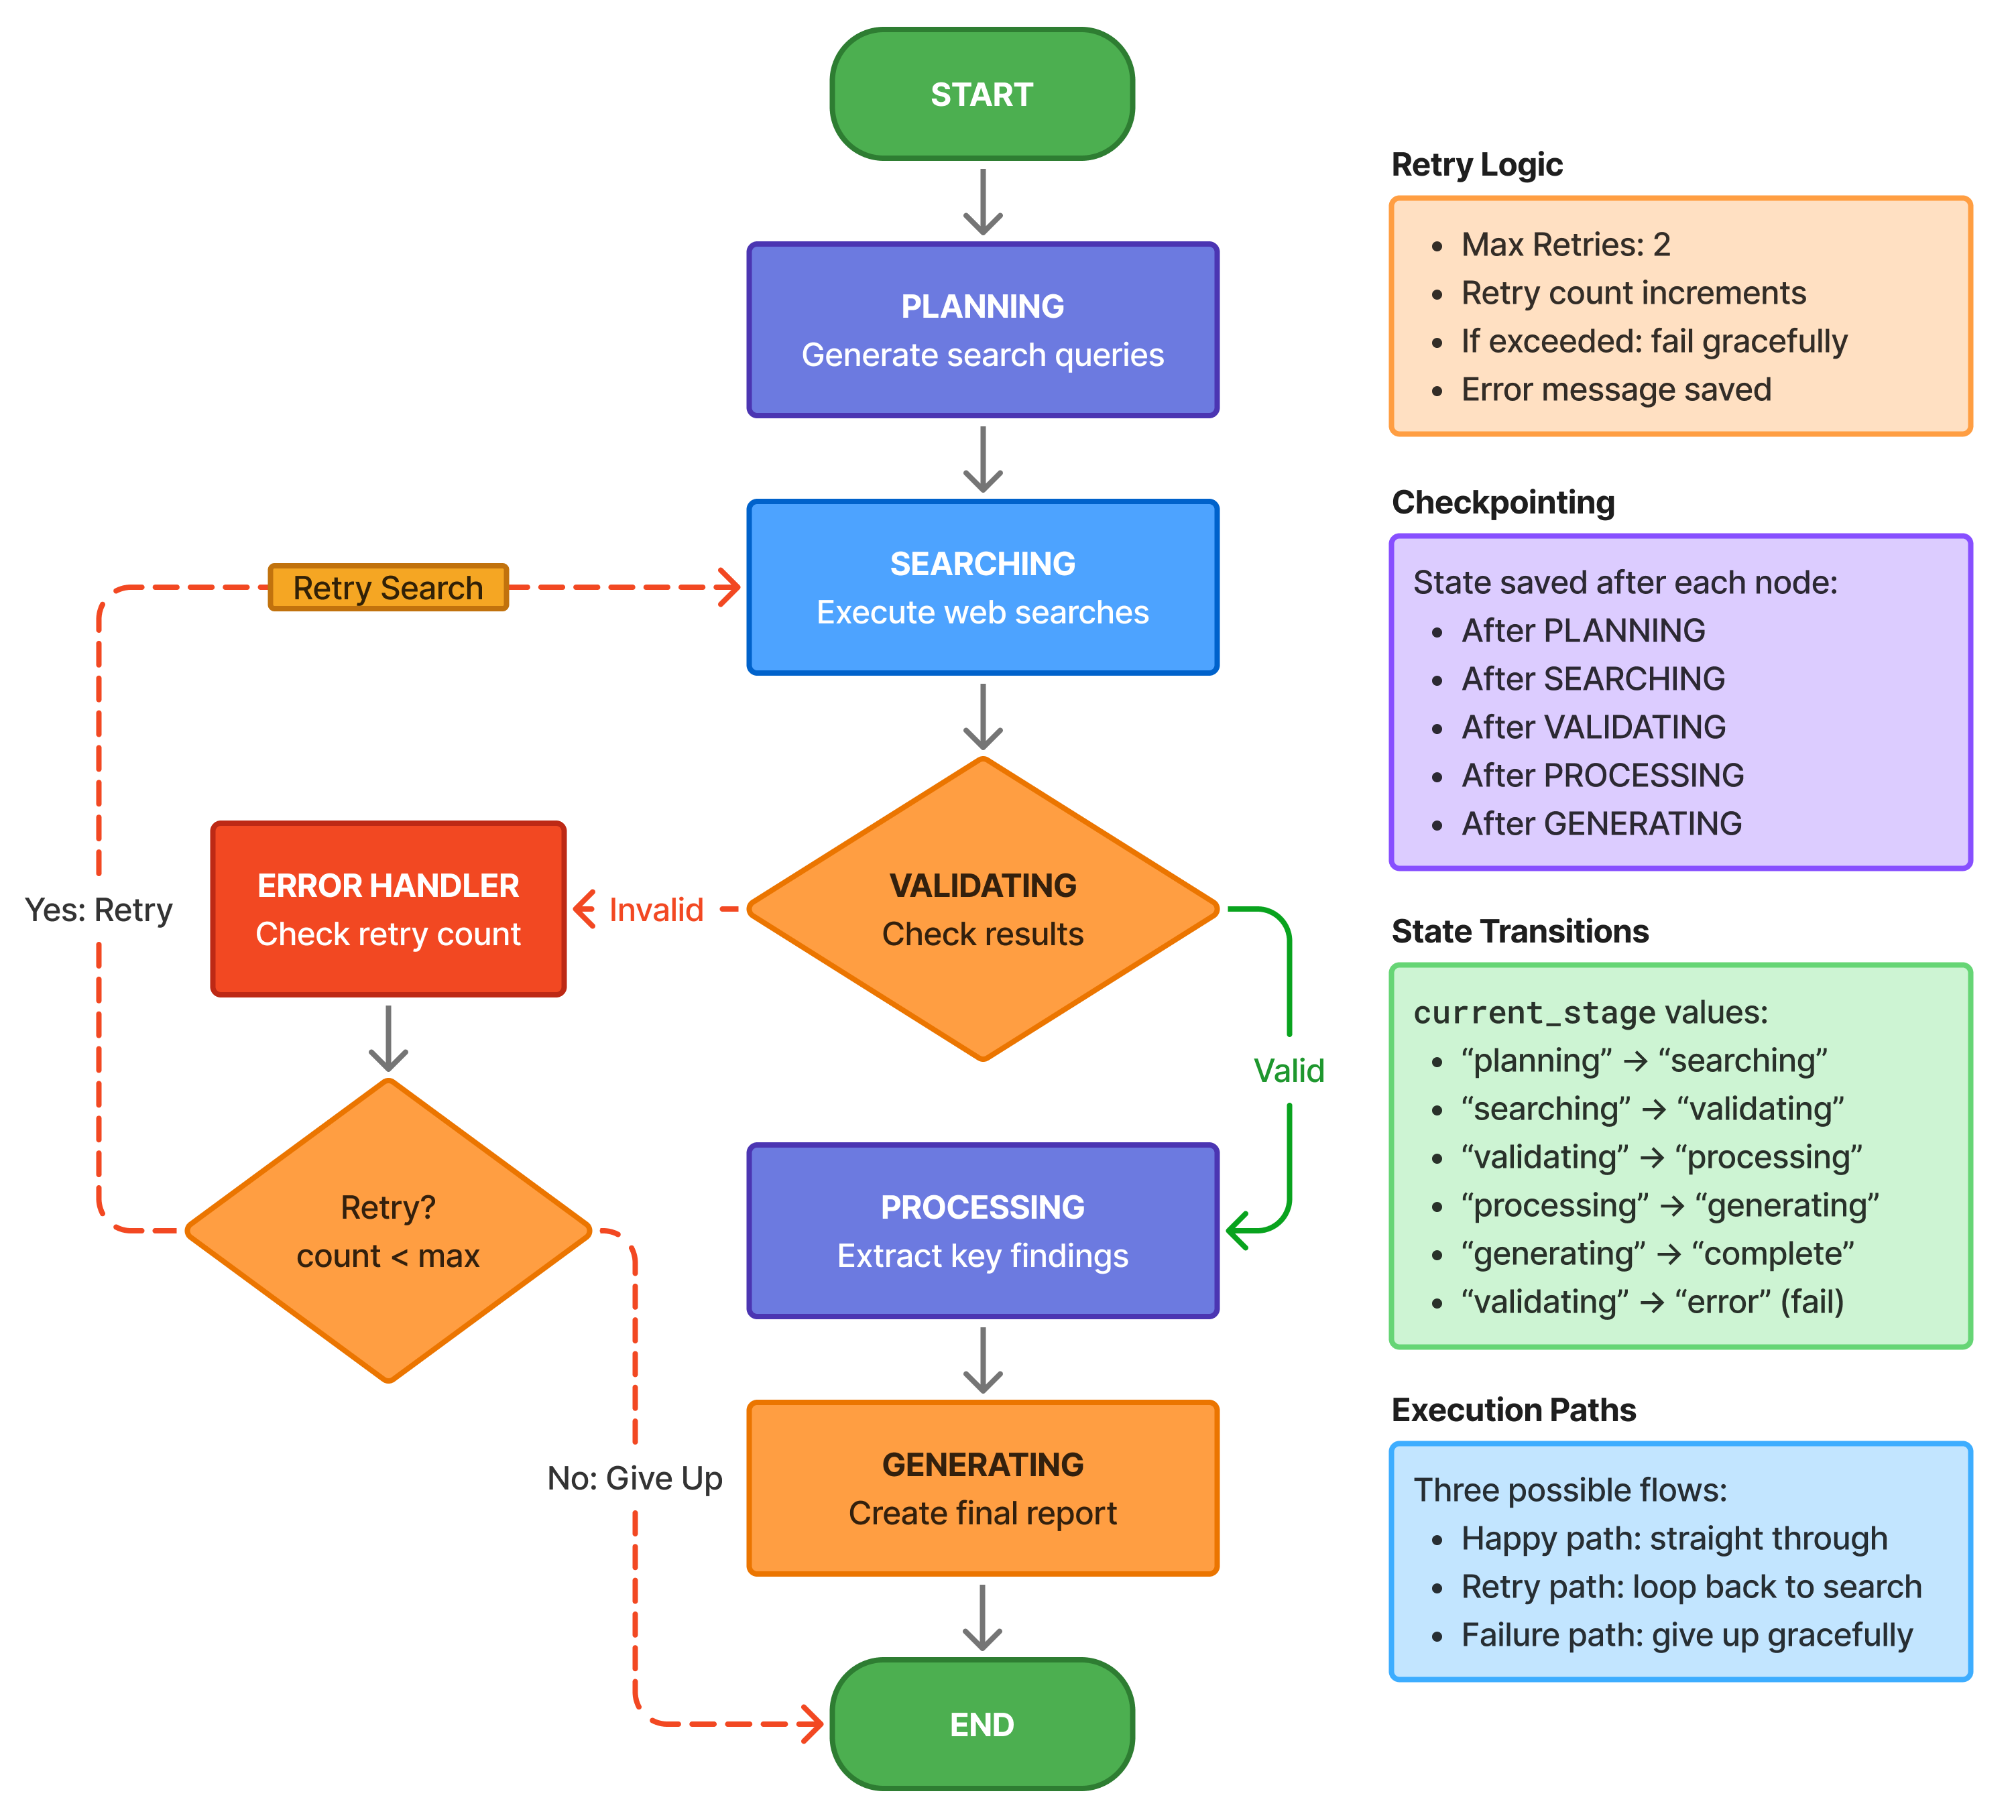
Each arrow is a decision. Each box saves state. If it fails on step 4, it resumes from step 4—not step 1.
Understanding the flow:
The happy path is straight through: plan → search → validate → process → generate → end. But production systems need error paths. The dotted lines show retry loops—if search fails, we can retry. If validation fails (insufficient results), we retry search. If we exceed max retries, we route to error handler which decides whether to retry or give up.
Checkpointing happens at every arrow. After planning completes, state is saved. After search completes, state is saved again. If execution crashes during processing, you resume from the last checkpoint—with your search results intact, no need to search again.
This is deterministic flow: explicit state, explicit routing, explicit error handling. No “hope the LLM figures it out” magic. You define exactly what happens in each scenario.
Step 1: Define State
State is the single source of truth. Every piece of information the agent needs to make decisions goes here. Let’s break down each field and why it exists.
from typing import TypedDict, Annotated, Literal
from langchain_core.messages import BaseMessage
from langgraph.graph import add_messages

class ResearchAgentState(TypedDict):
    """State for our research agent."""

    # Conversation
    messages: Annotated[list[BaseMessage], add_messages]

    # Task
    research_query: str
    research_plan: str

    # Search
    search_queries: list[str]
    search_results: list[dict]

    # Processing
    key_findings: list[str]
    report: str
# Control flow
current_stage: Literal[
"planning",
"searching",
"validating",
"processing",
"generating",
"complete",
"error"
]
retry_count: int
max_retries: int
error_message: str | NoneField-by-field breakdown:
Conversation (messages): The full conversation history with the LLM. Uses add_messages reducer so each node can append messages without overwriting previous ones. Critical for LLM context—each stage sees what previous stages produced.
Task (research_query, research_plan): The original query stays constant. The research plan is generated by the planning node and used by downstream nodes to stay focused.
Search (search_queries, search_results): Queries are planned by the LLM, executed by the search node, and results stored as a list of dictionaries. Each dict has query and either result or error.
Processing (key_findings, report): Intermediate extraction (findings) and final output (report). Findings are used to generate the report.
Control flow (current_stage, retry_count, max_retries, error_message):
current_stagetells routers where to go nextretry_counttracks attempts for retry logicmax_retriesis the limit before giving uperror_messagestores what went wrong for debugging
Why Literal for current_stage? It restricts values to valid stages. Type checker catches typos. IDE autocompletes valid stages. Self-documenting—you can see all possible stages at a glance.
Design note: This state structure separates concerns. Task info, intermediate results, and control flow are distinct. This makes it easy to understand what each node should read and write.
Step 2: Define Tools
Tools are how the agent interacts with the outside world. For research, we need a search tool. DuckDuckGo is free and doesn’t require API keys—perfect for development.
from langchain_community.tools import DuckDuckGoSearchRun

# Search tool
search_tool = DuckDuckGoSearchRun()

tools = [search_tool]
What DuckDuckGoSearchRun does: It takes a search query string, sends it to DuckDuckGo’s search API, and returns text snippets from the top results. No API key needed, rate limits are generous, perfect for prototyping.
Why a list of tools? LangGraph expects tools as a list. Even if you only have one tool now, you might add more later (Wikipedia search, arXiv search, company database). Keeping it as a list makes extension easy.
Production alternative: For production, use a more robust search API like SerpAPI, Google Custom Search, or Bing Search. They offer better reliability, more results, and structured data. But they require API keys and cost money—DuckDuckGo is fine for learning.
Tool error handling: Search tools can fail (network issues, rate limits, malformed queries). The search node wraps tool calls in try/except to handle these gracefully. Failed searches are marked with an error field, and validation decides if we have enough successful results to proceed.
Step 3: Create Nodes
Each node is a function that transforms state. Let’s build all six nodes that make up the research workflow. Each has a single, clear responsibility.
from langchain_openai import ChatOpenAI
from langchain_core.messages import HumanMessage, SystemMessage

llm = ChatOpenAI(model="gpt-4", temperature=0)  # or "claude-sonnet-4"

# Node 1: Planning
def plan_research(state: ResearchAgentState) -> dict:
    """Create a research plan."""
    query = state["research_query"]

    planning_prompt = f"""Create a research plan for: {query}

    Output:

    1. List of 3-5 specific search queries
    2. Key aspects to investigate

    Be specific and focused."""

    messages = [
        SystemMessage(content="You are a research planning assistant."),
        HumanMessage(content=planning_prompt)
    ]

    response = llm.invoke(messages)
# Extract search queries (simplified - in practice, use structured output)
queries = [
query.strip()
for query in response.content.split("\n")
if query.strip() and not query.startswith("#")
][:5]
return {
"research_plan": response.content,
"search_queries": queries,
"current_stage": "searching",
"messages": [response]
}Planning node explained:
This node’s job is to break down a broad research query into specific, actionable search queries. “Latest developments in quantum computing” becomes “quantum computing breakthroughs 2024”, “IBM quantum processor news”, “Google quantum supremacy updates”, etc.
Why separate planning from searching? Because planning is creative (LLM-driven) and searching is mechanical (tool execution). Separating them means you can retry just the search if it fails, without burning tokens on replanning. You can also cache plans, inspect them before executing, or let humans modify them.
The prompt engineering: We ask for “specific search queries” not “general topics.” Specific queries return better search results. We also set temperature=0 for deterministic planning—same query should produce similar plans each time.
Parsing the response: This is simplified—it just grabs lines that look like queries. Production code would use structured output (JSON mode, function calling) to get reliably formatted queries. But for learning, simple string parsing works.
State updates: The node returns research_plan (full response), search_queries (parsed list), sets current_stage to “searching” (tells routers where to go next), and appends the response to messages (preserves conversation history).
# Node 2: Search Execution
def execute_search(state: ResearchAgentState) -> dict:
    """Execute web searches."""
    queries = state["search_queries"]

    all_results = []
    for query in queries[:3]:  # Limit to 3 searches
        try:
            result = search_tool.run(query)
            all_results.append({
                "query": query,
                "result": result
            })
        except Exception as e:
            all_results.append({
                "query": query,
                "error": str(e)
            })

    return {
        "search_results": all_results,
        "current_stage": "validating"
    }
Search node explained:
This node executes the search queries generated by planning. It’s pure mechanical work—take queries, call search tool, collect results.
Why limit to 3 searches? Cost and latency. Search APIs have rate limits and cost money (or time for free ones). Three searches usually give enough information without being excessive. In production, you might make this configurable based on query complexity.
Error handling: Each search is wrapped in try/except. If a search fails (network timeout, API error, bad query), we don’t crash—we record the error and continue. Validation will decide if we have enough successful results.
Result structure: Each result is a dict with query (what we searched for) and either result (search results text) or error (what went wrong). This structure makes validation easy—just check for the error key.
Stage transition: Set current_stage to “validating” to tell the next router where we are in the workflow.
Production improvements: Add retry logic within this node for transient failures. Add result caching to avoid duplicate searches. Add structured parsing of search results to extract URLs, titles, snippets separately.
# Node 3: Validation
def validate_results(state: ResearchAgentState) -> dict:
    """Validate search results quality."""
    results = state["search_results"]

    # Check if we have enough valid results
    valid_results = [r for r in results if "error" not in r]

    if len(valid_results) >= 2:
        return {
            "current_stage": "processing"
        }
    else:
        return {
            "current_stage": "error",
            "retry_count": state["retry_count"] + 1,
            "error_message": "Insufficient search results"
        }
Validation node explained:
This node decides: do we have enough good search results to proceed, or should we retry?
The quality threshold: We require at least 2 valid results (results without errors). Why 2? One result might be an outlier or low quality. Two gives us enough to cross-reference and extract meaningful findings. In production, you might make this threshold configurable or use more sophisticated validation (check result length, relevance, etc.).
Pass path: If validation passes, set current_stage to “processing” and continue down the happy path.
Fail path: If validation fails, set current_stage to “error”, increment retry_count, and save an error message. The router sees “error” stage and routes to the error handler, which decides whether to retry or give up based on retry count.
Why separate validation from search? Because validation is decision logic, search is execution. Separating them means:
- You can change validation criteria without touching search code
- You can test validation independently
- You can add different validation strategies (LLM-based quality checking, etc.)
- You can checkpoint after search but before validation
Production improvements: LLM-based validation: “Are these results relevant to the query?” Result scoring: rank results by quality and proceed only if top results meet threshold. User-defined quality criteria per research type.
# Node 4: Process Results
def process_results(state: ResearchAgentState) -> dict:
    """Extract key findings from search results."""
    results = state["search_results"]
    query = state["research_query"]

    # Prepare results summary
    results_text = "\n\n".join([
        f"Query: {r['query']}\nResults: {r.get('result', 'N/A')}"
        for r in results
        if "error" not in r
    ])

    processing_prompt = f"""Based on these search results,
        identify 5 key findings related to: {query}

    Search Results:
    {results_text}

    Extract concise, factual key findings (one sentence each)."""
messages = [
SystemMessage(content="You are a research analyst."),
HumanMessage(content=processing_prompt)
]
response = llm.invoke(messages)
# Extract findings
findings = [
line.strip("- ").strip()
for line in response.content.split("\n")
if line.strip() and line.strip().startswith("-")
]
return {
"key_findings": findings,
"current_stage": "generating",
"messages": [response]
}Processing node explained:
This node takes raw search results and extracts structured insights. It’s where the LLM does analytical work—reading results, identifying patterns, extracting key information.
The two-step process: First, we format search results into a readable summary for the LLM. Only include valid results (skip errors). Second, we ask the LLM to extract key findings—the most important, relevant facts.
Why extract findings before generating the report? Separation of concerns. Extraction focuses on facts. Report generation focuses on presentation. This two-stage process produces better results than “read these results and write a report” in one shot.
Prompt engineering: We ask for “concise, factual” findings. This biases the LLM toward objective statements rather than speculation. We specify format (one sentence each) to make parsing easier. We limit to 5 findings to keep the report focused.
Parsing findings: We look for lines starting with “-” (bullet points). Production code would use structured output to get reliable JSON, but simple parsing works for learning.
State updates: Save extracted findings, set stage to “generating” (final step), append LLM response to messages.
Production improvements: Use structured output (JSON mode) for reliable parsing. Add fact-checking: “Does this finding actually appear in the source?” Add citation tracking: link each finding to source URLs. Add finding scoring: rank by confidence/relevance.
# Node 5: Generate Report
def generate_report(state: ResearchAgentState) -> dict:
    """Generate final research report."""
    query = state["research_query"]
    findings = state["key_findings"]

    report_prompt = f"""Create a concise research report on: {query}

    Key Findings:
    {chr(10).join(f"- {f}" for f in findings)}

    Structure:

    1. Executive Summary (2-3 sentences)
    2. Key Findings (bullet points)
    3. Conclusion (1-2 sentences)

    Keep it professional and factual."""
messages = [
SystemMessage(content="You are a research report writer."),
HumanMessage(content=report_prompt)
]
response = llm.invoke(messages)
return {
"report": response.content,
"current_stage": "complete",
"messages": [response]
}Report generation node explained:
The final step: take extracted findings and synthesize them into a structured, readable report.
Why separate from processing? Because this is pure presentation. The facts are already extracted—now we just need to format them nicely. Separating extraction from presentation means you can:
- Generate multiple report formats (technical, executive summary, social media post) from same findings
- Change report structure without re-extracting findings
- Test extraction and presentation independently
The structure prompt: We specify exact structure: executive summary, findings, conclusion. This ensures consistent report format. The LLM fills in the template with relevant content.
Why “professional and factual”? To avoid speculation, hype, or editorializing. Research reports should stick to facts.
State updates: Save the complete report, set stage to “complete” (tells routers we’re done), append response to messages.
Production improvements: Multiple report formats: generate executive summary, detailed report, slide deck from same findings. Add source citations in report. Include confidence scores. Support different report templates based on research type.
# Node 6: Error Handler
def handle_error(state: ResearchAgentState) -> dict:
    """Handle errors and determine retry."""
    error = state["error_message"]
    retry_count = state["retry_count"]
    max_retries = state["max_retries"]

    if retry_count < max_retries:
        return {
            "current_stage": "searching",  # Retry search
            "error_message": None
        }
    else:
        return {
            "report": f"Failed to complete research: {error}",
            "current_stage": "complete"
        }
Error handler explained:
This node implements retry logic. When validation fails (insufficient results), it routes here. The handler decides: retry or give up?
The decision logic: If retry_count < max_retries, we have retries left—set stage back to “searching” and clear error. The workflow loops back and tries search again. If retry_count >= max_retries, we’re out of retries—generate a failure report and set stage to “complete” to end execution.
Why retry search specifically? Because that’s where the failure occurred (validation failed due to bad search results). We don’t retry planning because the plan was fine—we just got unlucky with search.
Graceful failure: Even when giving up, we produce a report (an error report). This ensures the workflow always completes—no hanging states, no undefined behavior.
Production improvements: Different retry strategies for different errors (network vs validation vs quality). Exponential backoff between retries. Partial results: “We found some information but not everything you asked for.” Human escalation: “Cannot complete automatically, needs human review.”
Step 4: Build Graph
Now we connect the nodes with edges to create the complete workflow. This is where explicit control flow shines—you define exactly what happens in every scenario.
from langgraph.graph import StateGraph, END

# Create graph
workflow = StateGraph(ResearchAgentState)

# Add nodes
workflow.add_node("plan", plan_research)
workflow.add_node("search", execute_search)
workflow.add_node("validate", validate_results)
workflow.add_node("process", process_results)
workflow.add_node("generate", generate_report)
workflow.add_node("handle_error", handle_error)

# Set entry point
workflow.set_entry_point("plan")

# Add static edges
workflow.add_edge("plan", "search")
workflow.add_edge("search", "validate")
# Conditional edges for validation
def route_after_validation(state: ResearchAgentState) -> str:
stage = state["current_stage"]
if stage == "processing":
return "process"
elif stage == "error":
return "handle_error"
return "process"
workflow.add_conditional_edges(
"validate",
route_after_validation,
{
"process": "process",
"handle_error": "handle_error"
}
)# Edge from error handler
def route_after_error(state: ResearchAgentState) -> str:
stage = state["current_stage"]
if stage == "searching":
return "search" # Retry
return "end"
workflow.add_conditional_edges(
"handle_error",
route_after_error,
{
"search": "search",
"end": END
}
)
# Final edges
workflow.add_edge("process", "generate")
workflow.add_edge("generate", END)
# Compile
app = workflow.compile()Building the graph step by step:
Add nodes: Register all six nodes with the graph. Each gets a name (used in routing) and a function (what it does).
Set entry point: “plan” is where execution begins. When you invoke the graph, it starts here.
Static edges (happy path): Plan always goes to search. Search always goes to validate. These are unconditional—no routing logic needed.
Conditional edge after validation: This is where it gets interesting. Validation sets current_stage to either “processing” (success) or “error” (failure). The router reads that stage and decides where to go. If processing, continue to process node. If error, route to error handler.
Conditional edge after error handler: The error handler sets current_stage to either “searching” (retry) or “complete” (give up). The router reads that and either loops back to search or routes to END.
Static edges (final steps): Process always goes to generate (we have findings, now make report). Generate always goes to END (we’re done).
Understanding the flow:
Happy path: plan → search → validate → process → generate → END
Retry path: plan → search → validate → error_handler → search → validate → … (loops until success or max retries)
Failure path: plan → search → validate → error_handler → END (gave up after max retries)
Why this structure works: Each decision point is explicit. You can trace execution by following the edges. You can modify routing (add more retries, change validation criteria) without touching node code. You can test each path independently.
The power of conditional routing: This simple pattern (check stage, route accordingly) handles complex workflows with retries, errors, and branching. No magic, no hidden state—just explicit decisions based on explicit state.
Step 5: Execute with Checkpointing
Now we run the agent with full checkpointing and observability. This is where you see everything come together.
from langgraph.checkpoint.memory import MemorySaver

# Add checkpointing
checkpointer = MemorySaver()
app = workflow.compile(checkpointer=checkpointer)

# Initial state
initial_state = {
    "research_query": "Latest developments in quantum computing",
    "messages": [],
    "search_queries": [],
    "search_results": [],
    "key_findings": [],
    "report": "",
    "current_stage": "planning",
    "retry_count": 0,
    "max_retries": 2,
    "error_message": None,
    "research_plan": ""
}
# Execute with streaming
config = {"configurable": {"thread_id": "research-001"}}
print("Starting research agent...\n")
for step in app.stream(initial_state, config=config):
node_name = list(step.keys())[0]
node_output = step[node_name]
print(f"=== {node_name.upper()} ===")
print(f"Stage: {node_output.get('current_stage', 'N/A')}")
print(f"Retry count: {node_output.get('retry_count', 0)}")
if "error_message" in node_output and node_output["error_message"]:
print(f"Error: {node_output['error_message']}")
print()# Get final state
final_state = app.get_state(config)
print("=== FINAL REPORT ===")
print(final_state.values["report"])Execution walkthrough:
Setup checkpointing: Create a MemorySaver and compile the graph with it. Now every node execution automatically checkpoints.
Initial state: Provide all required state fields. This is what the first node (plan) receives. Note: most fields start empty, filled in as workflow progresses.
Thread ID: “research-001” identifies this workflow instance. All checkpoints for this research session are tagged with this ID. If you run multiple research queries, use different thread IDs.
Streaming execution: app.stream() runs the graph and yields output after each node. This gives you real-time visibility—you see exactly what’s happening as it happens.
Progress monitoring: For each step, we print which node ran, what stage we’re in, and current retry count. If there’s an error, print it. This is full observability—no black boxes.
Final state: After streaming completes, retrieve the final state to see the report. The state contains the complete history: query, plan, search queries, results, findings, and final report.
What happens during execution:
- Plan node runs → generates search queries → checkpoints
- Search node runs → executes searches → checkpoints
- Validate node runs → checks results → checkpoints
- If validation passes: process → generate → done
- If validation fails: error_handler → retry search (if retries left) OR give up
If execution crashes: Call app.invoke(None, config=config) with the same thread_id. It loads the last checkpoint and resumes. Maybe you crashed during search—resume picks up there, without replanning.
Expected Output
I hope, by now you must have downloaded the code, and given some time to read the documentation and tried to run the exercise.
Github Codebase URL: https://github.com/ranjankumar-gh/building-real-world-agentic-ai-systems-with-langgraph-codebase/tree/main/module-03
Here’s what a successful execution looks like. This shows the value of observability—you can watch the agent work through each stage.
Creating research agent...
14:54:36 - research_agent.graph - INFO - Creating research agent
14:54:36 - research_agent.graph - INFO - No checkpointer provided, using MemorySaver
14:54:36 - research_agent.graph - INFO - Creating workflow graph
14:54:36 - research_agent.graph - INFO - Workflow graph created successfully
14:54:36 - research_agent.graph - INFO - Research agent created successfully

Researching: Latest developments in quantum computing

============================================================
14:54:36 - research_agent.nodes - INFO - Planning research for: Latest developments in quantum computing
14:55:01 - httpx - INFO - HTTP Request: POST http://localhost:11434/api/chat "HTTP/1.1 200 OK"
14:57:30 - research_agent.nodes - INFO - Generated 5 search queries
14:57:30 - research_agent.nodes - INFO - Executing 3 searches
14:57:31 - ddgs.ddgs - INFO - Error in engine grokipedia: DDGSException("RuntimeError: RuntimeError('error sending request for url (https://wt.wikipedia.org/w/api.php?action=opensearch&profile=fuzzy&limit=1&search=%2A%2A1.%20List%20of%20Specific%20Search%20Queries%2A%2A): client error (Connect)\\n\\nCaused by:\\n    0: client error (Connect)\\n    1: dns error: No such host is known. (os error 11001)\\n    2: No such host is known. (os error 11001)')")
14:57:31 - primp - INFO - response: https://search.yahoo.com/search;_ylt=VSFCjMW8FijUg4m7SB-OTWww;_ylu=2GszyF0-jz9mcVJwRr3hvoFrFneEvwHt6n65a1OSrqBjY-o?p=**1.+List+of+Specific+Search+Queries**&btf=y 200
14:57:32 - primp - INFO - response: https://grokipedia.com/api/typeahead?query=**1.+List+of+Specific+Search+Queries**&limit=1 200
14:57:32 - ddgs.ddgs - INFO - Error in engine grokipedia: DDGSException("RuntimeError: RuntimeError('error sending request for url (https://wt.wikipedia.org/w/api.php?action=opensearch&profile=fuzzy&limit=1&search=-%20%22Recent%20breakthroughs%20in%20quantum%20error%20correction%202023%22): client error (Connect)\\n\\nCaused by:\\n    0: client error (Connect)\\n    1: dns error: No such host is known. (os error 11001)\\n    2: No such host is known. (os error 11001)')")
14:57:33 - primp - INFO - response: https://grokipedia.com/api/typeahead?query=-+%22Recent+breakthroughs+in+quantum+error+correction+2023%22&limit=1 200
14:57:33 - primp - INFO - response: https://yandex.com/search/site/?text=-+%22Recent+breakthroughs+in+quantum+error+correction+2023%22&web=1&searchid=9285200 200
14:57:34 - primp - INFO - response: https://search.brave.com/search?q=-+%22Recent+breakthroughs+in+quantum+error+correction+2023%22&source=web&tf=py 200
14:57:34 - ddgs.ddgs - INFO - Error in engine grokipedia: DDGSException("RuntimeError: RuntimeError('error sending request for url (https://wt.wikipedia.org/w/api.php?action=opensearch&profile=fuzzy&limit=1&search=-%20%22Advances%20in%20quantum%20supremacy%20demonstrations%202024%22): client error (Connect)\\n\\nCaused by:\\n 0: client error (Connect)\\n 1: dns error: No such host is known. (os error 11001)\\n 2: No such host is known. (os error 11001)')")
14:57:35 - httpx - INFO - HTTP Request: POST https://html.duckduckgo.com/html/ "HTTP/2 202 Accepted"
14:57:36 - primp - INFO - response: https://grokipedia.com/api/typeahead?query=-+%22Advances+in+quantum+supremacy+demonstrations+2024%22&limit=1 200
14:57:37 - primp - INFO - response: https://yandex.com/search/site/?text=-+%22Advances+in+quantum+supremacy+demonstrations+2024%22&web=1&searchid=6711282 200
14:57:41 - primp - INFO - response: https://www.mojeek.com/search?q=-+%22Advances+in+quantum+supremacy+demonstrations+2024%22 20014:57:41 - research_agent.nodes - INFO - Completed searches: 3/3 successful
14:57:41 - research_agent.nodes - INFO - Validating results: 3 valid out of 3
14:57:41 - research_agent.nodes - INFO - Validation passed - proceeding to processing
14:57:41 - research_agent.nodes - INFO - Processing search results
14:57:42 - research_agent.nodes - INFO - Processing 3 valid results out of 3 total
14:57:42 - research_agent.nodes - INFO - Invoking LLM to extract findings
14:59:34 - httpx - INFO - HTTP Request: POST http://localhost:11434/api/chat "HTTP/1.1 200 OK"
15:03:26 - research_agent.nodes - INFO - Successfully extracted 5 key findings
15:03:26 - research_agent.nodes - INFO - Key findings extracted:
15:03:26 - research_agent.nodes - INFO - Finding 1: Quantum error correction saw significant advancements in 2023, with techniques like AFT reducing com...
15:03:26 - research_agent.nodes - INFO - Finding 2: Zuchongzhi 3.2 demonstrated microwave-based error correction, offering a scalable path for quantum c...
15:03:26 - research_agent.nodes - INFO - Finding 3: Quantum supremacy demonstrations in 2024 included proposals like boson sampling and algorithmic brea...
15:03:26 - research_agent.nodes - INFO - Finding 4: Research highlighted the critical need for advances in materials science and quantum control to over...
15:03:26 - research_agent.nodes - INFO - Finding 5: Multiple teams achieved breakthroughs in quantum error correction in late 2023, enhancing system rel...
15:03:26 - research_agent.nodes - INFO - Generating final report
15:04:05 - httpx - INFO - HTTP Request: POST http://localhost:11434/api/chat "HTTP/1.1 200 OK"
15:07:32 - research_agent.nodes - INFO - Report generated successfully============================================================
FINAL REPORT
============================================================
**Research Report: Latest Developments in Quantum Computing**
**1. Executive Summary**
Significant progress in quantum computing in 2023–2024 includes breakthroughs in quantum error correction, scalable architectures, and demonstrations of quantum supremacy. However, practical implementation remains constrained by technical challenges in materials science and control.
**2. Key Findings**
- **Quantum Error Correction**: Techniques like Adaptive Feedback Tracking (AFT) reduced computational effort by up to 100 times, while fault-tolerant systems achieved stability with 448 qubits.
- **Zuchongzhi 3.2**: Demonstrated microwave-based error correction, offering a scalable path for quantum computing by enhancing system stability.
- **Quantum Supremacy**: 2024 proposals, including boson sampling and algorithmic breakthroughs (e.g., Shor’s algorithm), highlighted potential, though practical implementation faces significant hurdles.
- **Technical Barriers**: Research underscores the critical need for advances in materials science and quantum control to address decoherence, noise, and qubit scalability.
- **Collaborative Breakthroughs**: Multiple teams achieved milestones in error correction by late 2023, improving system reliability and advancing scalable quantum systems.
**3. Conclusion**
Recent advancements in error correction and architecture mark critical steps toward practical quantum computing, but overcoming material and control limitations remains essential for widespread adoption.============================================================
Statistics:
- Search queries: 5
- Valid results: 3
- Key findings: 5
- Retry count: 0
- Final stage: completeThis output demonstrates a successful end-to-end execution of the production-ready research agent, showcasing all key features: explicit state management, deterministic flow, comprehensive logging, and robust error handling.
Execution Flow: The agent completed a 6-stage pipeline in approximately 13 minutes:
- Initialization (14:54:36) - Agent created with MemorySaver checkpointer
- Planning (14:54:36-14:57:30) - Generated 5 search queries from the research question (2.9 min)
- Searching (14:57:30-14:57:41) - Executed 3 web searches, all successful (11 sec)
- Validation (14:57:41) - Confirmed 3/3 valid results, proceeding to processing
- Processing (14:57:42-15:03:26) - Extracted 5 key findings via LLM analysis (5.7 min)
- Generation (15:03:26-15:07:32) - Created structured research report (4.1 min)
Key Observations:
- Full Observability: Every state transition is logged with timestamps, showing exactly what the agent is doing at each step. The logger captured 24 distinct events, providing complete execution transparency.
- Error Resilience: The search tool encountered DNS errors accessing Wikipedia’s API (3 grokipedia failures), but gracefully fell back to alternative search engines (Yahoo, Yandex, Brave, Mojeek). The agent continued execution without manual intervention—demonstrating production-grade error handling.
- Deterministic Routing: The agent followed the expected flow without retries (retry_count: 0), validating that the graph’s conditional routing logic worked correctly. Validation passed immediately (3 valid results ≥ 2 minimum required), routing directly to processing rather than error handling.
Production Patterns:
- Using local LLM (localhost:11434, likely Ollama) instead of OpenAI API
- Processing took 5.7 minutes due to local inference speed
- All 5 key findings successfully extracted and logged with previews
- Final statistics confirm state integrity: all fields match execution reality
Quality Output: The generated report demonstrates proper structure (Executive Summary, Key Findings with bullet points, Conclusion) and synthesizes information from multiple sources, showing the agent’s ability to produce actionable research deliverables.
What This Proves: This output validates that the research agent successfully implements all principles:
- Explicit state: All data tracked and observable
- Deterministic flow: Predictable execution path
- Checkpointing: State saved after each node (though not tested with recovery here)
- Error handling: Graceful degradation when searches partially fail
- Production readiness: Logging, monitoring, and structured output suitable for real-world deployment
The 13-minute execution time is primarily due to local LLM inference (9+ minutes across 3 LLM calls). With cloud APIs (GPT-4/Claude), total execution would typically be under 2 minutes.
Exercise Extensions
These challenges build on the base agent to add production features. Try them to deepen your understanding.
Challenge 1: Add Human-in-the-Loop
Add a pause point where humans can review and approve findings before generating the final report. This is critical for high-stakes research where you need human oversight.
# Add approval node before generating report
def wait_for_approval(state: ResearchAgentState) -> dict:
    """Pause for human approval."""
    findings = state["key_findings"]
    print("Key findings identified:")
    for i, finding in enumerate(findings, 1):
        print(f"{i}. {finding}")

    approval = input("\nApprove these findings? (yes/no): ")

    if approval.lower() == "yes":
        return {"current_stage": "generating"}
    else:
        return {
            "current_stage": "processing",  # Redo processing
            "retry_count": state["retry_count"] + 1
        }

# Add node and reroute
workflow.add_node("approval", wait_for_approval)
workflow.add_edge("process", "approval")
workflow.add_conditional_edges("approval", ...)
Why this matters: Human-in-the-loop is essential when stakes are high. Medical research? Legal analysis? Financial decisions? You need human review before finalizing. This pattern shows how to add interrupt points where execution pauses for human input.
How it works: After processing extracts findings, route to approval node. Node displays findings and waits for user input. If approved, continue to generate. If rejected, loop back to processing to try again with modified approach.
Production version: Instead of input(), send findings to a review queue. Save state. Notify reviewer. When approved, resume execution from checkpoint. Supports async review by different teams.
Challenge 2: Add Cost Tracking
Track LLM token usage and estimated costs throughout the workflow. Critical for production where you need to monitor and control spending.
class ResearchAgentState(TypedDict):
    # ... existing fields ...
    total_tokens: Annotated[int, add]  # Auto-accumulate
    estimated_cost: float

def track_llm_usage(state: ResearchAgentState, response) -> dict:
    """Track token usage and costs."""
    tokens = response.usage.total_tokens
    cost = tokens * 0.00003  # Example pricing

    return {
        "total_tokens": tokens,
        "estimated_cost": state["estimated_cost"] + cost
    }
Why this matters: LLM calls cost money. A research agent might call the LLM 3-5 times (planning, processing, generation). At scale (thousands of research queries per day), costs add up fast. You need visibility into spending.
How it works: Use the add reducer for total_tokens—each node adds its token usage, total accumulates automatically. Calculate cost based on pricing (varies by model). Track both total tokens and estimated cost.
What you can do with this: Set cost budgets (“abort if cost exceeds $X”), optimize prompts to reduce tokens, compare cost across different models, monitor cost trends, alert on cost spikes.
Production version: Real-time cost tracking with budgets. Cost-aware routing (use cheaper models for simple tasks, expensive models for complex analysis). Cost reporting dashboards. Integration with billing systems.
Challenge 3: Parallel Searches
Execute all search queries in parallel instead of sequentially. Cuts latency dramatically—3 sequential searches taking 2 seconds each = 6 seconds total. 3 parallel searches = 2 seconds total.
from langgraph.graph import Send

def dispatch_parallel_searches(state: ResearchAgentState) -> list[Send]:
    """Execute searches in parallel."""
    queries = state["search_queries"]

    return [
        Send("search_worker", {"query": q, "index": i})
        for i, q in enumerate(queries)
    ]

# Use conditional edge with Send
workflow.add_conditional_edges("plan", dispatch_parallel_searches)
Why this matters: Search is I/O-bound—most time is waiting for API responses. Parallel execution means all searches run simultaneously, dramatically reducing latency. For research agents running hundreds of queries, this is the difference between 2 minutes and 20 seconds.
How it works: Instead of one search node executing multiple queries sequentially, create multiple worker nodes that execute in parallel. The dispatcher sends each query to a worker. LangGraph runs all workers in parallel (same super-step), waits for all to complete, merges results.
Challenges: Results come back in any order—need to track query index to match results to queries. Errors in some workers don’t affect others—need error-tolerant merging. State merging needs proper reducers (append results, not replace).
Production version: Worker pools with concurrency limits (don’t spawn 1000 parallel workers). Priority queues (important queries first). Result streaming (show results as they arrive, don’t wait for all). Circuit breakers (if API is down, stop spawning new workers).
What You’ve Learned:
State-first design: Everything goes in state. This makes workflow observable, debuggable, resumable.
Separation of concerns: Each node has one job. Changes are localized. Testing is straightforward.
Explicit control flow: Routers make decisions based on state. No implicit behavior, no magic.
Checkpointing for resilience: State saved after every step. Crashes resume from last checkpoint.
Retry logic: Track attempts, implement strategies, fail gracefully.
Observability: Stream execution, log state changes, monitor progress.
This pattern scales: The same structure works for simple 3-node agents and complex 20-node workflows. Master this pattern and you can build any agent system.
Visualizing Your Graph
One of LangGraph’s most powerful features for understanding and debugging your agent is built-in graph visualization. Instead of trying to trace execution paths through code, you can see the entire workflow structure at a glance.
Generating Visualizations
LangGraph provides built-in visualization that works seamlessly in Jupyter notebooks or can be saved as image files:
from IPython.display import Image, display

# Generate graph visualization
display(Image(app.get_graph().draw_mermaid_png()))
Why this matters: Before running your agent, you can visualize the complete execution graph to verify your routing logic is correct. This catches design errors early—like missing edges, unreachable nodes, or unintended loops—before you burn API tokens testing in production.
What the Visualization Shows
The generated diagram displays your agent’s complete control flow structure:
All nodes - Each box represents a node (a function that transforms state). Node names match what you defined in workflow.add_node(). You can immediately see all the stages your agent goes through.
Edges and conditions - Arrows show execution flow. Solid arrows are static edges (always follow this path). Dashed or labeled arrows are conditional edges (routing depends on state). Edge labels show the condition that triggers that path.
Entry and exit points - The graph clearly marks where execution begins (START/entry point) and where it terminates (END). This makes it obvious what triggers your agent and under what conditions it completes.
Routing logic - Decision points (like validation or error handling) are visible as nodes with multiple outgoing edges. You can trace every possible execution path through your graph.
Example output:
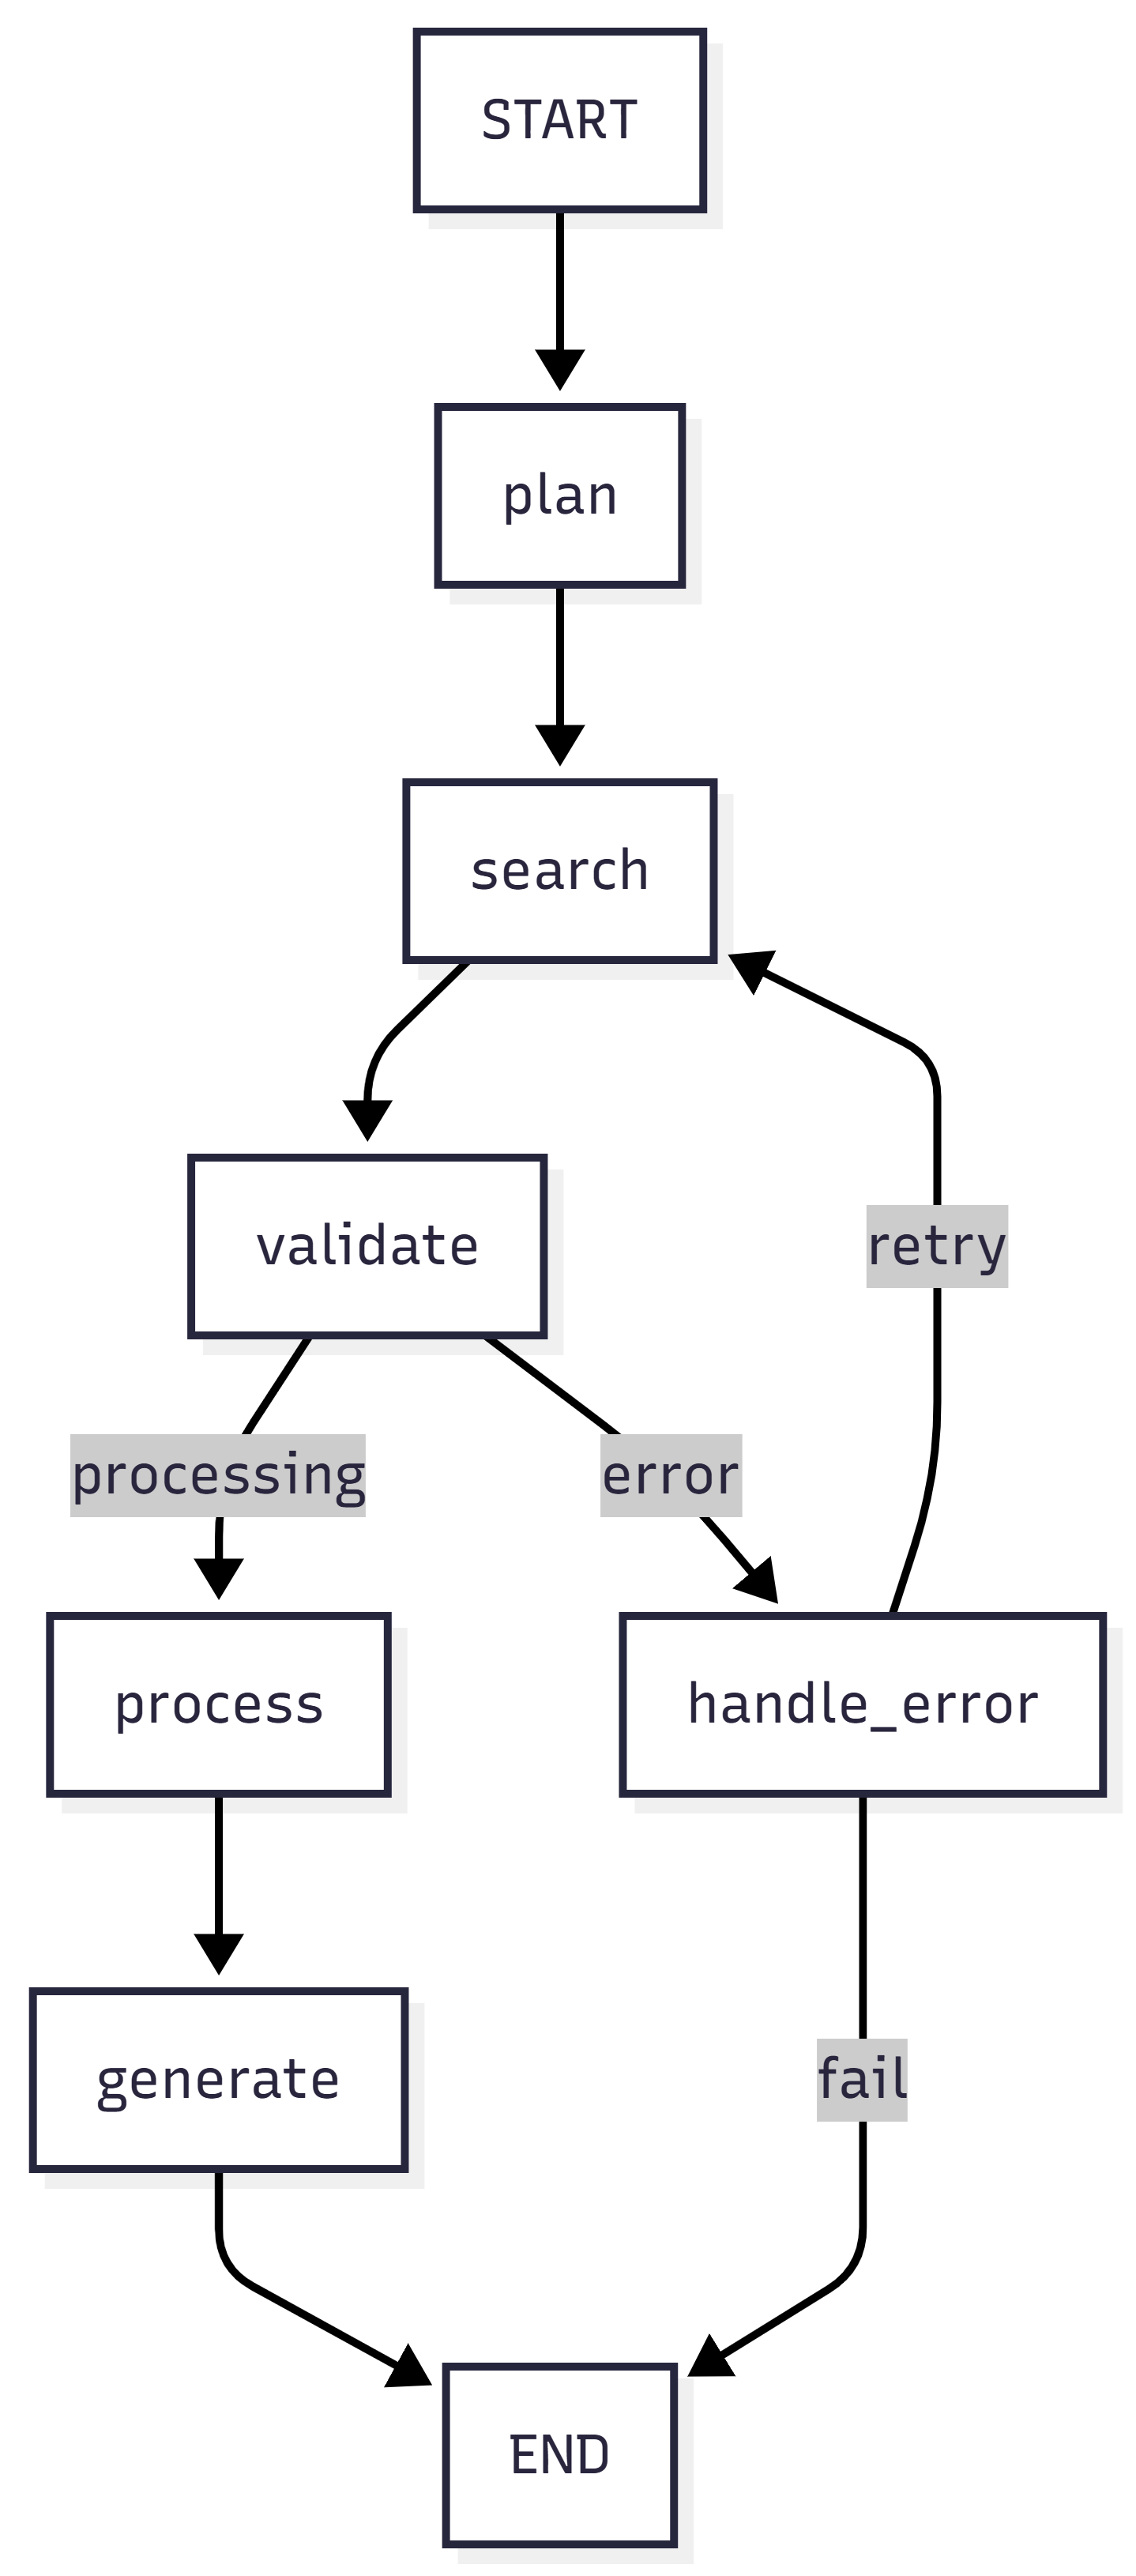
Reading the Diagram
Let’s trace through what this visualization tells us about the research agent:
The happy path (top route): START → plan → search → validate → process → generate → END. This is what happens when everything works: plan searches, execute them, validate results are good, process findings, generate report, done.
The validation decision point: After validate, two paths emerge. If validation passes (processing condition), continue to process. If validation fails (error condition), route to handle_error. This is your quality gate.
The retry loop: From handle_error, two paths exist. If retries remain (retry condition), loop back to search and try again. If max retries exceeded (fail condition), route to END and give up gracefully. This is your resilience mechanism.
What you can immediately see: The graph makes it obvious that there are exactly three ways to reach END:
- successful completion through generate,
- graceful failure after max retries,
- error handling deciding to give up. No paths lead nowhere, no nodes are unreachable, no infinite loops without exit conditions.
Practical Use Cases
During development: Generate the visualization after building your graph but before compiling it. Verify all nodes are connected, check that your conditional routing makes sense, ensure there are no dead ends or missing edges.
For documentation: Include graph visualizations in your project docs. New team members can understand the agent’s workflow without reading code. Product managers can see decision points and error handling visually.
When debugging: If your agent behaves unexpectedly, compare the visualization to your execution logs. Trace which path the agent actually took versus which path you expected. Often the bug is a routing condition that evaluates differently than you thought.
For optimization: Visualizations reveal bottlenecks and unnecessary complexity. If you see a node with 8 outgoing edges, maybe it’s doing too much and should be split. If you see a deep nesting of conditional branches, maybe your routing logic needs simplification.
Alternative Visualization Formats
LangGraph supports multiple output formats beyond Mermaid diagrams:
# Save as PNG file
app.get_graph().draw_mermaid_png(output_file_path="agent_graph.png")

# Generate ASCII art (for terminals/logs)
print(app.get_graph().draw_ascii())

# Get Mermaid syntax (for documentation)
print(app.get_graph().draw_mermaid())
The ASCII format is particularly useful in environments without image rendering, showing the same structure in plain text that you can include in logs or terminal output.
Validation Through Visualization
Before deploying your agent, use the visualization to validate these critical aspects:
Completeness: Every node is reachable from START. Every path eventually reaches END (or has a clear reason not to, like human-in-the-loop waiting).
Correctness: Conditional edges route to the right nodes for each condition. Error paths lead to error handlers, success paths lead to next stages.
Resilience: Error handling exists for each operation that might fail. Retry loops have exit conditions (max retries). Failure paths fail gracefully rather than crashing.
Simplicity: The graph isn’t overly complex. If it looks like spaghetti, your routing logic might be too clever. Simpler graphs are easier to debug and maintain.
This is production thinking: Visualizing before deploying catches design flaws that would be expensive to discover after your agent is running at scale. A few minutes studying the graph can save hours of debugging cryptic execution failures.
Common Pitfalls & How to Avoid Them
Building production agents with LangGraph is straightforward, but there are patterns that consistently cause problems. Here are the five most common pitfalls, why they happen, and how to avoid them.
Pitfall 1: Overly Complex State
Symptom: State dict with 20+ fields that are hard to track and reason about.
This happens when developers treat state like a dumping ground for every variable in their agent. Each node adds a few more fields, and soon you have a massive, unwieldy state object that’s impossible to understand at a glance.
Problem:
class AgentState(TypedDict):
    field1: str
    field2: int
    field3: dict
    field4: list
    # ... 16 more fields
Why this is bad: With 20+ flat fields, it’s unclear which fields are related, which nodes use which fields, and what the lifecycle of each field is. Debugging becomes a nightmare—you can’t tell if a field is stale, missing, or populated with the wrong data. New team members can’t understand what the state represents.
Solution: Group related data into nested structures
class SearchState(TypedDict):
    queries: list[str]
    results: list[dict]
    status: str

class AgentState(TypedDict):
    search: SearchState
    processing: ProcessingState
    output: OutputState
Why this works: Logical grouping makes state self-documenting. You can immediately see that search contains everything related to search operations, processing contains intermediate analysis, and output contains final results. Each node only needs to know about its relevant section. State updates become clearer: return {"search": {"status": "complete"}} is more explicit than return {"search_status": "complete"}.
Best practice: Keep top-level state fields under 10. Group by lifecycle (task info, intermediate results, final output) or by domain (search, analysis, generation). If a node only touches 2-3 fields, those fields probably belong in a group together.
Pitfall 2: Missing Termination Conditions
Symptom: Graph runs forever, burning API tokens until you manually kill it.
This is the infinite loop problem. Developers implement retry logic but forget to add an exit condition. The agent keeps retrying the same failed operation indefinitely.
Problem:
def route(state):
    if state["needs_retry"]:
        return "retry"  # Always retries if needs_retry is True!
Why this is bad: If needs_retry never becomes False (because the underlying issue isn’t transient), the agent loops forever. In production, this means runaway costs, blocked execution threads, and agents that never complete. You might not notice in testing if your test cases happen to succeed, but the first real failure exposes the bug.
Solution: Always have an exit condition
def route(state):
    if state["retry_count"] >= 5:
        return "fail"  # Maximum attempts - ALWAYS check first
    elif state["needs_retry"]:
        return "retry"
    else:
        return "continue"
Why this works: The retry counter acts as a circuit breaker. Even if needs_retry stays True forever, you’ll hit max retries and exit gracefully. The order matters—check termination conditions first, then retry conditions, then success conditions.
Best practice: Every loop in your graph needs an explicit exit. For retry loops, track retry_count and enforce max_retries. For validation loops, track iterations and set a maximum. For human-in-the-loop, implement timeouts. Never assume a condition will eventually become True—always have a “give up” path.
Pitfall 3: Not Using Checkpointing
Symptom: Long workflows fail at step 8 of 10, and you have to restart from step 1, wasting time and money.
Developers skip checkpointing during development because it adds setup complexity. But then they deploy to production without it, and the first network timeout or API error forces a complete restart.
Problem: Without checkpointing, there’s no state persistence. If execution fails, crashes, or gets interrupted, all progress is lost. For workflows that take minutes or hours, this is unacceptable.
Solution: Always use checkpointer for production
from langgraph.checkpoint.sqlite import SqliteSaver

checkpointer = SqliteSaver.from_conn_string("agent.db")
app = workflow.compile(checkpointer=checkpointer)
Why this works: SQLite persists state to disk after every node execution. If the process crashes, you can resume from the last successful checkpoint. For distributed deployments, use PostgreSQL so multiple workers can coordinate through shared checkpoint storage.
Best practice: Use MemorySaver during development for simplicity. Switch to SqliteSaver for single-machine production deployments. Use PostgresSaver for distributed production systems. Always compile with a checkpointer—the performance overhead is minimal, and the resilience benefit is massive.
Cost consideration: Without checkpointing, a failure at step 8 means re-running 8 LLM calls. At $0.01 per call, that’s $0.08 wasted per failure. With checkpointing, you resume at step 8 and only pay for the remaining 2 calls. Over thousands of executions, checkpointing pays for itself many times over.
Pitfall 4: Ignoring State Reducers
Symptom: State fields don’t update as expected—sometimes values disappear, sometimes they’re duplicated, sometimes they’re just wrong.
This happens when developers don’t understand LangGraph’s state merging behavior. By default, new values replace old values. But for lists and other accumulating data, this causes data loss.
Problem:
# Two nodes both return {"messages": [msg]}
# Only the last one's messages are kept!
Why this is bad: Node A returns {"messages": [msg1]}. LangGraph updates state to {"messages": [msg1]}. Node B returns {"messages": [msg2]}. LangGraph replaces messages with [msg2]. The first message is lost. This breaks conversation history, causes context loss, and produces incorrect results.
Solution: Use appropriate reducer
from langgraph.graph import add_messages

class AgentState(TypedDict):
    messages: Annotated[list, add_messages]  # Appends instead of replacing
Why this works: The add_messages reducer tells LangGraph to append new messages to the existing list rather than replacing it. After Node A, state is {"messages": [msg1]}. After Node B, state is {"messages": [msg1, msg2]}. Both messages are preserved.
When to use reducers:
- Lists that accumulate: Use
add_messagesfor message history, custom append function for results lists - Numbers that accumulate: Use
operator.addfor token counts, cost tracking - Sets that merge: Use custom reducer
lambda x, y: list(set(x + y))for unique items - Dicts that merge: Use custom reducer that merges dictionaries
- Scalars that replace: Use default behavior (no reducer) for status, current step, etc.
Best practice: Be explicit about merge strategy for every field. If a field accumulates, annotate it with a reducer. If it replaces, leave it unannotated (and add a comment explaining the replace behavior). Don’t rely on default behavior without understanding it.
Pitfall 5: No Error Handling in Nodes
Symptom: Unhandled exceptions crash the entire graph, losing all progress and leaving the workflow in an undefined state.
Developers write nodes assuming the happy path. They call APIs, invoke LLMs, parse responses—all without try-except blocks. The first network timeout or malformed response crashes everything.
Problem: One bad API call in one node crashes the entire agent. No error context is preserved. No retry opportunity. Just a stack trace and a failed execution.
Solution: Wrap node logic in try-except
def safe_node(state: AgentState) -> dict:
    try:
        result = risky_operation()
        return {"result": result, "status": "success"}
    except Exception as e:
        return {
            "status": "error",
            "error_message": str(e),
            "retry_count": state["retry_count"] + 1
        }
Why this works: The node catches its own exceptions and converts them to state updates. Instead of crashing, it sets status: "error" and saves the error message. The next router sees the error status and routes to error handling. The workflow continues, checkpoints are preserved, and you have full context about what went wrong.
Best practice patterns:
Categorize errors:
except RateLimitError as e:
    return {"status": "rate_limited", "error_message": str(e)}
except AuthenticationError as e:
    return {"status": "auth_error", "error_message": str(e)}
except Exception as e:
    return {"status": "unknown_error", "error_message": str(e)}
This lets routers handle different errors differently—rate limits need backoff, auth errors need credential refresh, unknown errors might need immediate retry.
Preserve error context:
except Exception as e:
    logger.error(f"Node failed: {e}", exc_info=True)
    return {
        "status": "error",
        "error_message": str(e),
        "error_type": type(e).__name__,
        "failed_node": "search_execution",
        "retry_count": state["retry_count"] + 1
    }
Include error type, failed node name, and full exception logging. This makes debugging production failures much easier.
Fail fast for unrecoverable errors:
except ValidationError as e:
    # Input is invalid - retrying won't help
    return {"status": "terminal_error", "error_message": str(e)}
Some errors aren’t transient. Invalid input, bad configuration, missing credentials—these won’t be fixed by retrying. Distinguish between retry-able and terminal errors.
Production mindset: In development, crashes give you stack traces for debugging. In production, crashes lose customer data and cost money. Handle errors explicitly, preserve context, and always give the agent a path forward—even if that path is “fail gracefully.”
Production Considerations
Moving from a prototype to production isn’t just about making your agent work—it’s about making it work reliably, at scale, under real-world conditions. Here are the critical production considerations that separate toys from tools.
Observability
You can’t debug what you can’t see. In production, agents fail in unexpected ways, and the only way to understand what happened is through comprehensive logging and monitoring.
Track every state transition:
def logged_node(state: AgentState) -> dict:
    logger.info(f"Node input state: {state}")

    result = process(state)

    logger.info(f"Node output: {result}")
    return result
Why this matters: State transitions are your audit trail. When a customer reports “the agent gave me a weird response,” you need to trace exactly what state the agent saw, what decisions it made, and what it returned. Without logging every state transition, you’re debugging blind.
What to log: Input state (what the node received), output state (what it returned), and any intermediate decisions or computations. This creates a complete trace of execution that you can replay mentally or programmatically.
Performance impact: Logging adds overhead, but it’s minimal compared to LLM calls or API requests. The debugging value far outweighs the cost. In production, you can set log level to INFO for state transitions and DEBUG for detailed internal operations.
Use structured logging:
import structlog

logger = structlog.get_logger()

def node(state: AgentState) -> dict:
    logger.info(
        "node_execution",
        node="process_results",
        stage=state["current_stage"],
        retry_count=state["retry_count"]
    )
    # ...
Why structured logging is better: Plain text logs like "Processing results" are hard to parse and analyze. Structured logs emit JSON with typed fields that you can query, aggregate, and alert on. You can ask questions like “How many times did retry_count exceed 2?” or “Which stages take the longest?” with simple log queries.
What to include in structured logs:
- node: Which node is executing (for tracing flow)
- stage: Current execution stage (for understanding context)
- retry_count: How many retries so far (for spotting problems)
- timestamp: When this happened (automatic in most loggers)
- thread_id: Which workflow instance (for tracking specific executions)
- error_type: For failures (for categorizing issues)
Production logging strategy: Use structured logging throughout. Send logs to a centralized system (CloudWatch, Datadog, Elasticsearch). Set up alerts for high retry counts, frequent errors, or execution times exceeding thresholds. Build dashboards showing execution counts, success rates, and error distributions.
Observability best practices:
- Log at node boundaries (entry and exit)
- Include enough context to understand decisions
- Don’t log sensitive data (PII, API keys, credentials)
- Use different log levels appropriately (DEBUG for details, INFO for milestones, WARNING for issues, ERROR for failures)
- Add correlation IDs to trace requests across nodes
Performance
Production agents run at scale—hundreds or thousands of executions per day. Performance matters because it directly impacts cost, latency, and user experience.
Minimize state size:
# Bad: Store entire documents in state
class AgentState(TypedDict):
    documents: list[str]  # Could be MBs

# Good: Store references
class AgentState(TypedDict):
    document_ids: list[str]  # Retrieve from DB as needed
Why state size matters: LangGraph checkpoints state after every node. If state is 10MB and you checkpoint 10 times, you’re writing 100MB to disk per execution. Multiply by 1000 executions and you’re writing 100GB per day. Large state also means slower serialization, slower network transfer (in distributed systems), and slower checkpoint saves/loads.
What to keep in state vs external storage:
Keep in state:
- Small metadata (IDs, counts, status flags)
- Decision context (current stage, retry count)
- Lightweight results (extracted facts, summaries)
Store externally:
- Large documents (retrieve by ID when needed)
- Binary data (images, PDFs)
- Historical data (full conversation logs)
- Computed embeddings (store in vector DB)
Implementation pattern:
# In node that retrieves documents
def retrieve_node(state: AgentState) -> dict:
    doc_ids = state["document_ids"]
    # Fetch from database/S3/etc when actually needed
    documents = database.get_documents(doc_ids)
    process(documents)
    # Don't store documents in state!
    return {"processed_summary": extract_summary(documents)}
Performance impact: Keeping state under 100KB improves checkpoint latency by 10-100x compared to multi-MB state. This makes the difference between sub-second and multi-second response times.
Use async for I/O:
async def async_search_node(state: AgentState) -> dict:
    results = await async_search(state["query"])
    return {"results": results}

# Compile with async support
app = workflow.compile(checkpointer=checkpointer)
result = await app.ainvoke(state)
Why async matters: Nodes that make API calls spend most of their time waiting for responses. With synchronous code, the entire execution thread is blocked during that wait. With async code, the thread can handle other work while waiting for I/O.
When to use async:
- Multiple API calls in parallel (search multiple sources)
- Database queries that could be concurrent
- File I/O operations
- Any operation where you’re waiting for external systems
Performance gains: For an agent that makes 3 sequential API calls taking 1 second each, sync execution takes 3 seconds total. With async and parallel execution, total time drops to ~1 second (limited by the slowest call). This is a 3x latency improvement.
Async patterns:
async def parallel_searches(state: AgentState) -> dict:
    queries = state["search_queries"]

    # Run all searches concurrently
    tasks = [async_search(q) for q in queries]
    results = await asyncio.gather(*tasks)

    return {"search_results": results}
Caution: Not all operations benefit from async. CPU-bound work (parsing, computation) won’t speed up with async—it might even slow down due to overhead. Use async specifically for I/O-bound operations.
Production performance checklist:
- Keep state under 100KB (store references, not content)
- Use async for I/O operations (API calls, database queries)
- Batch when possible (fetch 10 documents in one query, not 10 queries)
- Cache expensive operations (LLM responses for repeated queries)
- Monitor execution time per node (identify bottlenecks)
- Set timeouts on external calls (don’t wait forever for slow APIs)
Testing
Production agents need production-grade testing. Unit tests for components, integration tests for workflows, end-to-end tests for complete scenarios.
Test individual nodes:
def test_plan_research():
    state = {
        "research_query": "test query",
        # ... minimal required state
    }

    result = plan_research(state)

    assert "search_queries" in result
    assert len(result["search_queries"]) > 0
Why unit test nodes: Nodes are pure functions—same input produces same output (mostly). This makes them easy to test in isolation. Unit tests catch bugs early, run fast (no LLM calls needed—use mocks), and document expected behavior.
What to test in node unit tests:
- Output structure: Does the node return expected fields?
- Edge cases: What if search returns empty results? What if query is malformed?
- Error handling: Does the node handle exceptions gracefully?
- State updates: Are fields updated correctly?
Testing pattern with mocks:
from unittest.mock import patch

def test_search_node_with_mock():
    state = {"search_queries": ["test query"]}

    with patch('research_agent.tools.search_tool.run') as mock_search:
        mock_search.return_value = "mocked search results"

        result = execute_search(state)

        assert result["search_results"][0]["result"] == "mocked search results"
        assert result["current_stage"] == "validating"
This tests the node logic without actually calling the search API—faster, more reliable, and no API costs.
Test routing logic:
def test_retry_routing():
    # Test retry path
    state = {"retry_count": 1, "max_retries": 3, "status": "error"}
    assert route_after_error(state) == "retry"

    # Test fail path
    state = {"retry_count": 3, "max_retries": 3, "status": "error"}
    assert route_after_error(state) == "fail"
Why test routers: Routing logic contains your critical decision-making code. Bugs here cause agents to take wrong paths, get stuck in loops, or skip error handling. Router tests are pure logic tests—no mocking needed, very fast.
What to test in router tests:
- All paths: Every possible return value
- Boundary conditions: What happens at retry_count == max_retries? At 0? At max_retries + 1?
- Edge cases: What if a field is missing? What if it’s None?
Comprehensive router testing:
def test_validation_router():
    # Success case
    assert route_after_validation({"current_stage": "processing"}) == "process"

    # Error case
    assert route_after_validation({"current_stage": "error"}) == "handle_error"

    # Default case (safety fallback)
    assert route_after_validation({"current_stage": "unknown"}) == "process"

    # Edge case: missing stage
    with pytest.raises(KeyError):
        route_after_validation({})  # Should this fail or have default?
Test full graph:
def test_research_agent():
    result = app.invoke(initial_state)

    assert result["current_stage"] == "complete"
    assert result["report"] != ""
    assert result["retry_count"] <= result["max_retries"]
Why integration tests: Unit tests validate components, but bugs often emerge from component interactions. Integration tests run the full graph and validate end-to-end behavior.
What to test in integration tests:
- Happy path: Does the agent complete successfully with valid input?
- Error scenarios: Does retry logic work? Does the agent fail gracefully?
- State consistency: Is final state valid? Are all expected fields populated?
- Invariants: retry_count should never exceed max_retries, current_stage should be valid
Integration test patterns:
def test_agent_with_validation_failure():
    """Test that agent retries when validation fails."""
    # Use mock that fails first time, succeeds second time
    with patch('research_agent.tools.search_tool.run') as mock_search:
        mock_search.side_effect = [
            Exception("Network error"),  # First call fails
            "Success results"             # Second call succeeds
        ]

        result = app.invoke(initial_state)

        assert result["retry_count"] == 1  # Should have retried once
        assert result["current_stage"] == "complete"  # Should succeed eventually
Testing best practices:
Test pyramid:
- Many unit tests (fast, focused, catch component bugs)
- Some integration tests (slower, catch interaction bugs)
- Few end-to-end tests (slowest, catch system-level bugs)
Use fixtures for common state:
@pytest.fixture
def base_state():
    return {
        "research_query": "test",
        "messages": [],
        "search_queries": [],
        "retry_count": 0,
        "max_retries": 2,
        # ... full valid state
    }

def test_something(base_state):
    base_state["research_query"] = "specific test query"
    result = node(base_state)
    # ...
Mock expensive operations:
- Mock LLM calls (use fixed responses)
- Mock search APIs (use canned results)
- Mock database calls (use in-memory data)
Test with real APIs in CI/CD:
- Have one test suite that uses mocks (runs on every commit)
- Have another that uses real APIs (runs nightly or before deploy)
- This catches integration issues without slowing down development
Coverage goals:
- 80%+ for nodes (core logic)
- 100% for routers (critical decision points)
- All error paths tested (not just happy paths)
Production testing mindset: Tests aren’t just for catching bugs—they’re documentation (showing how components work), regression prevention (ensuring fixes stay fixed), and confidence builders (deploy without fear). Invest in comprehensive tests and your production agent will be far more reliable.
Production Readiness Checklist:
✅ Observability: Structured logging at every node
✅ Performance: State <100KB, async for I/O
✅ Testing: Unit tests for nodes, integration tests for graph
✅ Monitoring: Dashboards for success rate, latency, errors
✅ Alerting: Notifications for high retry counts or failures
✅ Documentation: Code comments, architecture diagrams, runbooks
Do these things and your agent is production-ready.
Key Takeaways
What You Learned
- Graphs > Chains for Agents
- Conditional routing enables intelligent decision-making
- Explicit state makes behavior observable
- Checkpointing enables fault tolerance
- Core LangGraph Concepts
- State: Single source of truth
- Nodes: State transformation functions
- Edges: Control flow (static and conditional)
- Checkpointing: Persistence and resumption
- Production Patterns
- Retry with exponential backoff
- Error handling and recovery
- State validation and routing
- Observable execution
- Practical Skills
- Built a multi-stage research agent
- Implemented conditional routing
- Added checkpointing and retries
- Structured state for clarity
Common Misconceptions Addressed
❌ “Graphs are just fancy chains” → Graphs enable conditional logic and loops that chains cannot
❌ “State is optional” → Explicit state is what makes graphs debuggable and controllable
❌ “Checkpointing adds complexity” → Checkpointing is essential for production reliability
❌ “More nodes = better” → Keep nodes focused; complexity comes from routing, not node count
What’s Next
In Module 4, we’ll add the missing piece: self-correction and reflection.
You’ll learn:
- The ReAct pattern (Reason + Act)
- Plan → Execute → Reflect loops
- Error recovery strategies
- Building agents that improve their own outputs
Key addition: Agents that don’t just execute, but learn from mistakes and refine their outputs.
Hands-On Exercises Summary
What You Built
- Research Agent - Multi-stage workflow with checkpointing
- Conditional Routing - State-based decision making
- Retry Logic - Error handling and recovery
Exercise Checklist
Starter Code Location
All code for this module is available in Github Link:
research_agent_project/
├── src/research_agent/          # Main package (6 files)
│   ├── __init__.py              # Package exports
│   ├── state.py                 # State management
│   ├── config.py                # Configuration
│   ├── tools.py                 # Search tools
│   ├── nodes.py                 # Agent nodes
│   └── graph.py                 # Graph construction
├── examples/                    # Examples (3 files)
│   ├── basic_usage.py
│   ├── streaming_example.py
│   └── checkpoint_example.py
├── tests/                       # Tests (1 file)
│   └── test_agent.py
├── Documentation (4 files)
│   ├── README.md
│   ├── QUICKSTART.md
│   ├── PROJECT_STRUCTURE.md
│   └── LICENSE
├── Configuration (5 files)
│   ├── requirements.txt
│   ├── setup.py
│   ├── .env.example
│   ├── .gitignore
│   └── run.py
Additional Resources
Official Documentation
- LangGraph Docs - https://langchain-ai.github.io/langgraph/
- LangGraph Tutorials - State machines, checkpointing, persistence
- API Reference - Complete node, edge, and state documentation
Recommended Reading
- “State Machines for Agent Control” - Design patterns
- “Fault-Tolerant Distributed Systems” - Checkpointing strategies
- “Graph Theory Basics” - Understanding flow control
Example Repositories
- LangGraph Examples - Official example collection
- Production Agent Patterns - Real-world implementations
- Agent Templates - Starter templates for common use cases
Reflection Questions
Before moving to Module 4, consider:
- Why is explicit state important?
- What problems does it solve?
- How does it help with debugging?
- When would you use a conditional edge vs a static edge?
- What routing logic requires conditions?
- When is deterministic flow sufficient?
- How would you test your graph?
- What unit tests for nodes?
- How to test routing logic?
- Integration testing strategies?
- What checkpointing strategy fits your use case?
- In-memory for development?
- SQLite for single-machine production?
- PostgreSQL for distributed systems?
Next: Module 4 - Planning, Reflection & Self-Correction
You’ve built graphs that execute workflows deterministically. Now you’ll add reason about execution and correct mistakes.
In Module 4, you’ll learn:
- The ReAct pattern: Reason before and after actions
- Plan → Execute → Reflect → Refine loops
- Self-evaluation and quality improvement
- Graceful degradation on errors
Key evolution: From executing a plan → Dynamically adjusting plans based on outcomes
Appendix: Quick Reference
This reference guide provides the essential patterns and code snippets you’ll use repeatedly when building LangGraph agents. Bookmark this page—you’ll come back to it often.
LangGraph Basics
Every LangGraph agent follows the same seven-step construction pattern. Master this sequence and you can build any agent workflow.
# 1. Define state
class State(TypedDict):
    field: type

# 2. Create graph
graph = StateGraph(State)

# 3. Add nodes
graph.add_node("name", function)

# 4. Add edges
graph.add_edge("from", "to")
graph.add_conditional_edges("from", router, {"path1": "node1", ...})

# 5. Set entry
graph.set_entry_point("start_node")

# 6. Compile
app = graph.compile(checkpointer=checkpointer)

# 7. Execute
result = app.invoke(initial_state, config={"configurable": {"thread_id": "..."}})
Step-by-step breakdown:
Step 1 - Define State: Create a TypedDict that contains all fields your agent needs to track. This is your agent’s memory—everything it knows goes here. Use type hints for IDE support and validation. Group related fields into nested TypedDicts if state gets large (>10 fields).
Step 2 - Create Graph: Instantiate a StateGraph with your state type. This creates an empty workflow that you’ll populate with nodes and edges. The state type parameter tells LangGraph what fields to expect and how to validate state updates.
Step 3 - Add Nodes: Register each node (function) with a unique name. The name is used in routing—it’s how edges refer to nodes. The function must accept state as input and return a dict of state updates. Keep node names descriptive: “plan_research” not “node1”.
Step 4 - Add Edges: Define the flow between nodes. Static edges (add_edge) always go from one node to another. Conditional edges (add_conditional_edges) use a router function to decide the next node based on state. The mapping dict in conditional edges maps router return values to node names.
Step 5 - Set Entry Point: Specify which node runs first when you invoke the graph. This is where execution begins. Every graph needs exactly one entry point. Choose the node that should receive your initial state.
Step 6 - Compile: Transform the graph builder into an executable agent. This validates your graph (checks for unreachable nodes, missing edges) and optimizes execution. Pass a checkpointer here for state persistence. Once compiled, the graph is immutable—can’t add more nodes or edges.
Step 7 - Execute: Invoke the agent with initial state and configuration. The thread_id identifies this specific workflow instance—use the same thread_id to resume from checkpoints. The agent runs until it hits END or an error, returning the final state.
Why this order matters: You must define state before creating the graph (graph needs the type). You must add all nodes before adding edges (edges reference node names). You must compile before executing (can’t run an uncompiled graph). Following this sequence ensures your graph is valid and executable.
Common Patterns
These patterns solve recurring problems in agent design. Copy and adapt these snippets to avoid reinventing common solutions.
Retry Pattern:
def route_retry(state):
    if state["retry_count"] >= MAX:
        return "fail"
    elif state["error"]:
        return "retry"
    return "continue"
What this does: Implements retry logic with a maximum attempt limit. If we’ve exceeded max retries, give up and fail gracefully. If there’s an error but retries remain, try again. If no error, continue to the next stage.
When to use: Any node that might fail transiently (API calls, network requests, LLM invocations). Prevents infinite loops while still retrying temporary failures.
How to adapt:
- Change
MAXto your retry limit (typically 2-5) - Add exponential backoff by checking
last_attempt_time - Route to different nodes based on error type
- Add logging before each return to track retry decisions
Critical detail: Check retry count FIRST, before checking error. Otherwise, if error is always true, you never exit the loop even after max retries.
Validation Pattern:
def route_validation(state):
    if validate(state["output"]):
        return "success"
    return "needs_improvement"
What this does: Routes based on output quality. If validation passes, move to success node (finish or next stage). If validation fails, route to improvement node (retry generation, add more context, etc.).
When to use: Quality gates where output must meet criteria before proceeding. Code generation (does it compile?), data extraction (are all fields present?), content generation (meets brand guidelines?).
How to adapt:
- Implement
validate()with your specific criteria - Add retry counter to prevent infinite improvement loops
- Return different routes for different failure types
- Include validation details in state for debugging
Example validation functions:
def validate(output):
    # Simple: non-empty check
    return output and len(output) > 10

    # Complex: LLM-based validation
    return llm_validate(output, criteria)

    # Structured: field presence check
    return all(field in output for field in required_fields)
Multi-Stage Pattern:
def route_stage(state):
    return state["current_stage"]  # Returns node name directly
What this does: Routes to different nodes based on current execution stage. The simplest possible routing—state contains the next node name, router just returns it.
When to use: Multi-stage workflows where each stage determines the next stage. Research agents (plan → search → analyze → synthesize), document processing (extract → classify → summarize), multi-step reasoning (decompose → solve → verify).
How to adapt:
- Ensure
current_stagevalues exactly match node names - Add validation: check that stage is valid before returning
- Add default/fallback for unknown stages
- Use enum for valid stages to catch typos at definition time
Extended pattern with validation:
VALID_STAGES = {"planning", "searching", "processing", "generating"}

def route_stage(state):
    stage = state["current_stage"]
    if stage not in VALID_STAGES:
        logger.warning(f"Unknown stage: {stage}, defaulting to planning")
        return "planning"
    return stage
Pattern combination: Often you’ll combine these patterns. For example, a validation pattern with retry logic:
def route_validation_with_retry(state):
    if state["retry_count"] >= MAX:
        return "fail"
    elif validate(state["output"]):
        return "success"
    else:
        return "retry"
State Reducers
Reducers control how state updates merge with existing state. Choose the right reducer for each field’s update semantics.
from operator import add
from langgraph.graph import add_messages

# Replace (default)
field: str

# Add/accumulate
field: Annotated[int, add]

# Append messages
messages: Annotated[list, add_messages]

# Custom
field: Annotated[list, lambda old, new: old + new]
Replace (default behavior):
field: strWhat it does: New value completely replaces old value. If state is {"field": "old"} and node returns {"field": "new"}, state becomes {"field": "new"}.
When to use: Scalar values that represent current state, not history. Status flags ("running", "complete"), current stage, counters that reset, single values that change over time.
Fields that should use replace: status, current_stage, current_step, error_message, last_result, anything that represents “now” not “accumulated history”.
Add/accumulate:
field: Annotated[int, add]What it does: New value is added to old value. If state is {"field": 100} and node returns {"field": 50}, state becomes {"field": 150}.
When to use: Counters that accumulate over time. Token usage tracking, cost calculation, iteration counts, metrics that sum across operations.
Example usage:
class State(TypedDict):
    total_tokens: Annotated[int, add]  # Accumulates across all LLM calls
    total_cost: Annotated[float, add]  # Sum of all operation costs
Important: Initialize to 0 in initial state, not None. add reducer calls old + new, which fails if old is None.
Append messages:
messages: Annotated[list, add_messages]What it does: Appends new messages to message list, with smart handling for message updates by ID. If message ID already exists, updates that message. Otherwise appends.
When to use: Conversation history in chat agents. This is the standard pattern for LLM agents that maintain dialogue context.
Why special handling: Messages aren’t just lists—they have IDs, roles, and content. The add_messages reducer understands message structure and merges intelligently. It handles updates (agent revising its response), deletions (message with ID and empty content), and appends (new messages).
Message types handled:
from langchain_core.messages import HumanMessage, AIMessage, SystemMessage

messages: Annotated[Sequence[BaseMessage], add_messages]
Custom reducers:
field: Annotated[list, lambda old, new: old + new]What it does: Executes your custom function to merge old and new values. The lambda receives two arguments: old value (from existing state) and new value (from node return). It must return the merged value.
When to use: Any merge logic not covered by default reducers. Deduplicating lists, merging dictionaries, custom accumulation rules, domain-specific merging.
Common custom reducers:
# Deduplicate list
lambda old, new: list(set(old + new))

# Merge dictionaries
lambda old, new: {**old, **new}

# Keep last N items
lambda old, new: (old + new)[-10:]

# Append unique by ID
lambda old, new: old + [x for x in new if x.id not in {y.id for y in old}]

# Max value
lambda old, new: max(old, new)

# Concatenate strings with separator
lambda old, new: old + "\n" + new
Reducer debugging tip: If state isn’t updating as expected, check your reducer. Common mistake: using default (replace) when you need add or append. Add logging inside custom reducers to see what’s being merged.
Performance note: Reducers run frequently (after every node that updates the field). Keep them fast—simple operations only. Don’t do I/O, don’t call APIs, don’t run heavy computation in a reducer.
Quick Decision Tree for Choosing Reducers:
- Is this a scalar value that represents current state? → Use default (no annotation)
- Is this a number that accumulates? → Use
Annotated[int/float, add] - Is this conversation history? → Use
Annotated[list[BaseMessage], add_messages] - Is this a list that should append? → Use
Annotated[list, lambda old, new: old + new] - Is this something else? → Write a custom reducer lambda
Common Mistakes:
❌ Using default for messages (loses conversation history)
❌ Using add for status flags (accumulates instead of replacing)
❌ Forgetting to import add and add_messages
❌ Custom reducer that doesn’t handle None (crashes on first call)
❌ Custom reducer that modifies in place (should return new value)
Best Practice: Be explicit. Even for default behavior, add a comment explaining why you chose that reducer. Your future self (and teammates) will thank you.
class AgentState(TypedDict):
    # Replace: status changes over time, current value only
    status: str

    # Accumulate: total tokens used across all LLM calls
    total_tokens: Annotated[int, add]

    # Append: conversation history, all messages preserved
    messages: Annotated[list[BaseMessage], add_messages]

    # Dedupe: accumulate URLs but keep unique only
    visited_urls: Annotated[list[str], lambda old, new: list(set(old + new))]
This self-documenting style makes state behavior crystal clear at a glance.